
From junk to a daily driver.
Here
are some pictures of the journey of this old ambulance. I'm currently
rebuilding it to use as
a daily driver, and I will try to get it
on the road as soon as possible. I bought it in July 2005, outside of
Örebro some 350 miles from home. The trip with this beast on
the trailer was not the funniest ride
I ever had....
But let's not get ahead of things. First, a picture of how it looked
once, while still in service. The
picture does not show this
actual vehicle, but a “sister vehicle”, same year and
same company
that made the high top. Looks nice, eh?

Photo
by: Willhelm Wahrenberg
So, lets take a look-see on how it
looked when I first found it.
It had just been standing there for
25 years....

Hmmmm..... Do I really want this? Let's look some more!

Eeeuuuwwww... Y'all think I need therapy?
Okay, so it needs a washing. And some
new sheet metal. And a diesel engine. And some more....
But when I
finally got it home, it looked a lot better. I'll tell you that
getting it on the trailer was a
hellish task. One brake locked
up, winch wire busted, the tractor used to pull it up broke down...
But finally we got the beast loaded.
Maybe a tad of an overload according to Swedish regulations
but we
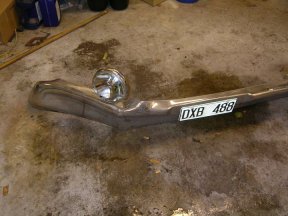
got it home okay. This is what it looked like:
![]()
On
our way home....
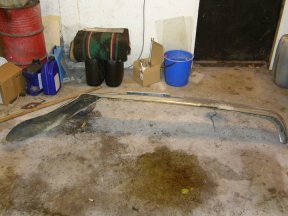
In the following pictures it finally has arrived at its new home.

Just
unloaded the bugger.... Looks nice though, don't it?

Before we start to do things, let's
see what we really got. A copy of the line setting ticket
is a
good place to start. Below is a scan of the ticket, with some VIN
numbers removed
because those are of no interest to the public...
This ticket is the key to about
everything on the vehicle. There are no ”standard” IH:s,
and
the linesetting ticket clearly tells what parts were used to
build this specific vehicle.
A good thing to have if spareparts
are needed!

Now the real work starts.
So,
lets start tearing it apart. Finding rust, contemplating, and finding
some more rust....
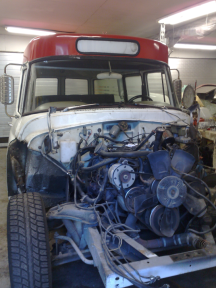
Engine
out, and mom inspecting my work. All she saw was rust....
Well, after washing and touching up
the engine bay and frame it was time to take the old lady inside
(not mom, the IH). Time to do something about the engine. The old
BG-241 went out, though it
was in good condition, and a GM 6.2
litre diesel V8 went in. The T-28 BW auto trans was
replaced with
a TH700R4. Me likes overdrive!


Before...
After...
Nice
thing about the swap was that the length of both packages were equal,
so I don't have to
customize the length of the drive shaft. The
front U-joint on the IH drive shaft fits in a TH350 slip
yoke,
and the TH350 slip yoke fits the TH700.
No problems with
clearance, but I had to make a new tranny mount crossmember.
It looks
a bit of a mess, but that will be cleaned up later. Lets check the
supports for the engine
mounts... It's amazing what you can do
with a welder, some time, and a pile of scrap!

Engine
mount supports tacked in place. They are made of 2½
inch square pipe.
I don't
have the slightest idea of what the engine mounts are. Got them on a
swap meet and they
bolted right up! If anyone know what they are,
prey tell!
The drive
shaft really did not need any modification. I just had to add a TH350
slip yoke on the
existing front U-joint. Looks like this:

Front
part of drive shaft.
When I
have put it in place I'll probably put two small tacks in the splined
intersection. No need
to have it slide in two places, eh?
Okay, so let's take a lookie on the exhaust...
I can't say it was
easy to fabricate the right front downpipe. It was real tight and I
had to cut out a piece
of carrier for the original tranny
crossmember. But as it is not used anymore...
Well, over to
pictures,

Right
downpipe and collector of 2x2” to one 3”.
The left to right crossover pipe was fairly simple, just a couple of bends.

Crossover
pipe from the left to the right side.
I did say it was tight at the right side, didn't I? Let's have a lookie and see...

Collector
pipe. Had to cut out a piece of the tranny crossmember...
The rear parts were not really a problem. Muffler fitted just as if it was made for the ol' girl.

Middle
section mounted. Looks nice, eh? Muffler is a 3” straight
through.
Some welding and bending fixed the rear part quite nicely. Had to
drag it far to the right
because the spare tire hanger...

Got
it right over the rear axle too....
So, with engine in place it's time to pay some attention to reddish
brown cancerous stuff.
The left rocker panel was almost gone, the
right one could be saved but i cut that one out too. Much
to be
able to see what was going on the inside.

Right
rocker cut out.
The right one was in much better shape than the left one, and I only
had to replace the outer panel.
On the left side I also had to
replace the bottom of the rocker, and a piece of the outer wheel
well.

New
left rocker panel and rear outer wheel well. Lots of grinding to
do...
Another place where these babies tend to rust out is the front cowl.
Drain holes get clogged. In
this case the front fenders had been
repaired once before, and all drain holes where covered with
body
mastic... Wouldn't surprise me if it was done on purpose in hope that
the particular body
shop would get more to do.
Well, I had to cut open the front cowl on both sides and weld new
sheet metal in the bottom of it.
If not, rain water from the
ventilation channel would have been running right into the cab...
This is how it looks stitched together, after the surgery:

Right
front cowl, welded together again.
So, time to do something about the front fenders and the front. I cut
out the rusted pieces and
treated the minor rust attacks with
phosphoric acid. New sheet metal was welded in, and the
fenders
and front look pretty okay. Remember, it's gonna be my daily driver,
it's not a complete
resto job. :)

Front
patched.
The front
looked okay until it was removed. Then I found out that the bottom
cross member
was almost gone. Well, some pieces of angle
bent sheet metal took care of that. Then I cut out,
bent, and
welded in a fresh lower part of the front. Looks okay, I think.
So, what about the fenders? Let's take a look at them and see what had to be done...

Left
fender.
Not much to be done, except for the rear part of it. Cut out and
welded some sheet in the back
of it, ground down the surface rust
and treated it with phosphoric acid.

Right
fender, a lot more to fix on this one!
The picture isn't the best, but as you can see, there was some more
to cut and paste on this one.
I also had to rebuild the inner
parts of the fender almost completely. After grinding down the
tacks, I'll use body lead to shape it up. Lead is good, plastic
is baaaad....
Here's a pic of the complete right fender:

Well, it's been kinda slow the last week. But, I have de-rusted and
painted the inner front
fenders. A steel brush on the angle
grinder does marvels with the brown stuff! Then two
coats of
black Hammerite, and presto!
I've also started on the heating system, dropping in new hoses, and
started to clean up
the electrical system on the engine. Lots of
unneeded stuff, like EGR, EPR, TPS and
other stuff. Thought I'd
finish heating and electrical stuff before starting to assemble
the
engine compartment.
Finished up the wireing for the engine and tranny. Looks really good.
Everything is bundled
into one cable channel on the right inner
fender. There were some extra wires from the
engine, like the
glowplug light, water in fuel light, and the TCC wire. These were
wired
into the original IH wireing harness in those wires that
are obsolete for a diesel engine.
So, Here's a picture of the new engine wireing harness...

Right
side engine and lighting harness.
Thinking of the electrical stuff i found out that the Amp meter would
not cope with the
output of the alternator on the 6.2 litre diesel
engine. So I did it the easy way, I just
bypassed the gauge under
the dash. Here's a picture.

Amp
meter disconnected. The new lump of electrical tape is the wires
bundled together.
This also gave me one more unused cable, one of the feeds to the amp
gauge, for other
use. This one will be used as a + feed from the
brake pedal connector to the TCC.
I still have a problem though... I havent found a steering box yet,
and my time window
for getting one fitted is closing... mental
note Get one ASAP!!!
Picture below....

The
missing power steering box....
Well, the steeringbox isn't missing
anymore. After a lengthy quest I found a suitable box
at a local
junk yard. It's from a Mazda pickup. It was a bit shallow so I had to
cut into the
frame rail to get it down enough to fit the pitman
arm. Still gotta do the hoses and get
a nice steering column,
with tilt and maybe even telescope function...

Mazda
powersteering box in place.
The radiator is in place also. I had
to lower it ½” to let the lower hose get free from the
fan.
I also had to fab a new fan shroud as the fan on the 6.2 is a
lot bigger than the original one.
More work than I thought, but
the diesel needs a lot of cooling and the rad is a little
smaller
than I'd like.

Radiator
and fan shroud. Did some cut'n paste...
Next up is mounting the engine oil
cooler with its thermostat, then the tranny cooler. Just
got them,
nice, new and shiny...

![]()
Engine
oil cooler with thermostat, and tranny cooler. Cool! (pun intended)
While at it, I decided to do a little
more work.... I started fabbing the filler pipes for the
tank.
The old rubber hoses were rotted and dry, the piece of metal pipe was
rusted through.
So, I fabbed two new pipes from 2” exhaust
bends. One from tank to filler neck, and then
the filler neck.
Still have to cut the filler neck plate to shape, fix overflow, vent,
and return line.
Looks like this:


Left
goes to tank, filler neck (right picture) connects to top.
That does it for this week. Next week will be devoted to coolers and hoses...
Well, I've been lazy. But today I
finally got my butt out of bed and started on the coolers and
hoses.
The transmission cooler was a piece of cake, just sandwiching it to
the radiator with
the mounting stuff that was in the box. The
engine oil cooler was a bit more difficult, I had to
make my own
fixtures and the hoses were a pain to route. Here's pictures:
![]()

Transmission
cooler and engine oil cooler.
Lets see how it looks on the same picture, easier to see how it looks that way...

Front
picture showing both tranny and engine oil cooler.
I also did the rear brakes. I traded
the old BG-241 for a complete set of brakes, front
and rear.
Shoes, wheel cylinders, hardware kit, and a kit for the master.
Thought it was
a good deal since I was going to swap engine
anyway. Pics say more than words, so
here we go.....


Rear
brakes and rear drum.
The rear drums were in very good
condition so no turning is needed. I used high temp
copper paste
where I thought parts needed a bit of lubing. This has proved to be a
good
thing during the years I've worked with cars and trucks.
The next few days I'll use to hook up
the powersteering, and finish up the oil and water
hoses. Then
it's time to fill her up with fresh oil and coolant, hook up the
throttle and power,
and then it's starting time! Can't wait to
start her up!!
Well, maybe I'll have to hook up the tank first,
but after that.... smile
Okay, so today I hooked up the power
steering. And did some minor things like adjusting
hoses and
fabbing a bracket for the throttle wire... Powersteering hoses and
reservoir
looks like this:

Powersteering
reservoir and hoses.
The bracket for the throttle wire was
quite easy... I just took the bracket from the wire to the
cruise
control and modified it a little. Then I took a bracket from a rear
axle u-joint, two bolts
and a hoseclamp, and clamped it to the
tranny dipstick pipe. Sounds awful, but doesn't look
that bad.
Had to fab a connection between the accelerator linkage and the
throttle wire too.

Throttle
cable bracket and linkage.
Couldn't help it, I just had to take
another shot of the engine compartment. Now it starts
looking
like something useful...

Engine
compartment, front view.
I also got a stab at the front
brakes. Nothing much to be said about them, new shoes and
new
cylinders, cleaning and a wheel bearing adjustment.

Front
brakes.
That pretty much sums it up for this
update. Will try to do more work and update after the
upcoming
weekend.
Well, the weekend came and went. I
was occupied with domestic stuff, like birthdays and
such, so I
didn't do anything. But hey, there was another weekend coming and
this time I
got some stuff done!
I rebuilt the master brake cylinder
so I can have some brakes on the old girl. Just have to
bleed
them, which I'll do when I remember to dig out the brake bleeder from
its hidings.
I also gave the vacuum booster a touch-up. I will go
for a hydraboost setup when I can
dig up the cash needed, or if
the vacuum boster is gone to the dogs. But that is a later
story.
Here's a picture of the fixed up combo....

Looks
okay I think. A wire wheel on the angle grinder works wonders....
I also got started on the second
battery shelf on the passenger side. With the 6.2 I need
dual
batteries, which is a lot cheaper than a single huge diesel battery.
I measured and cut
out a hole in the passenger side inner fender
to accomodate the battery shelf. Picture time!

Cut
out seen from the wheel well.
Bent and welded some sheet metal,
added reinforcements, and welded it in place.
Looks pretty okay, I
think...

Battery
shelf welded in place.
A little black roofing paint makes a
pretty good rust protection. This paint is heavy and
has a very
high solids value, 67%, which makes it perfect for rust protection.

First
coat applied...
Another obstacle of getting further
with this build has been the steering column, or the
lack of a
steering column, to be more precise... Now that is taken care of as I
found a
nice one from a Chevy van in the junk yard. Got it
complete with everything needed.
I have to do some re-wireing
though, as the multi-switch on the column for the wipers
supply
ground to the wiper motor on the chebby. Two relays will take care of
that.

Steering
column from a '89 chebby van.
Had to move the firewall mounting
bracket up 1½”, and change the angle a little
to make
it fit. Also had to make the slot for the steering column in the dash
a
little wider. I love that angle grinder!
Here's how it looks
when loosely mounted with some wire.....

Steering
column and wheel in place.
One thing I have to deal with before
fabbing the mounting bracket for the column is
that the hi/lo beam
switch on the column interferes with the pedal/column mounting
brackets. I'm inclined to ”rednecking” that problem
with the angle grinder. But We'll
see...
Turned out I didn't have to redneck
the hi/lo switch. Just trimmed the plastic and bent
the
connectors a little, and voilá! Been busy working on the truck
and haven't rememberd
to bring the camera, so pictures are coming
later.
So, I've done the brackets for the
steering column. I used the original ones and welded
on some ears
for the column and distances to the mounting brackets under the dash.

Upper
steering column bracket.
The steering column is finally in
place and secured. I also had to fab the piece between
the
steering column and the steering gear, not that it was much of a
problem though.
I just used the lower part of a Volvo 740 steering
shaft and fabbed an adapter between
that and the Mazda steering
gear. I also cut 6” from the upper Volvo steering shaft to
get
the Volvo lower shaft connected to the Chevy column. Fits like a hand
in a glove.

Steering
shaft, mostly Volvo parts.
I also did most of the work of
connecting the shifter linkage. Fabbed the link between
the
tranny and the shift lever. Now I just have to decide how I'll do the
pivot point for the
shifter axle at the frame.

Shifter
link at transmission.
Did a little other things too, like
connecting the last hose (vacuum to mastervac) and
mounting the
left inner fender. At last it feels like I'm getting
somewhere...
Picture of engine compartment with my nice dual
battery setup....

Starts
looking allright!!
There's still some minor things to do
in there, like taking out the choke wire, mount a windshield
washer
tank, and finish up the electrical stuff. Maybe some last minute
touch-ups too....
Well, today I got the tank in place,
and fixed the last things with the filler neck, vent, and fuel
hoses.
Also rigged the return hose from the injection pump. More work than
anticipated, but
it feels good to have it done.
Then there's the thing about
connecting the column wiper/washer switch (and its electronics)
to
the IH wiring. And the turn signals, and the key switch. No worries
though, I have that pretty
much figured out. Good to have
complete service manuals for both chevy and IH....
The last few weeks have been filled
with domestic things, like tiling the groud floor bathroom.
And
ofcourse my old friend Murphy stuck up his ugly head from the hole
where I last stomped
him down... The fuel shutoff solenoid in the
injectionpump on my chebby van broke down. Had
to ”borrow”
the one from the 6.2 in the IH. That sucks.
On the bright side, I've got the
engine running after its two years rest! It was a lot of work
to
bleed the air out of the fuelsystem, all the way to the
injectors. I even had to give it a a small
dose of ether to get it
to fire up. Well, anyway, it runs but the injectionpump is leaking so
I
guess I'll have to take the biscuit and get a rebuilt one.
At last I took the courage to start
applying bodylead to the fenders and the front cowl. I
haven't
worked with body lead in 15 years, so I was somewhat rusty in the
technique of
applying it. But the result was pretty okay, I think.
Picture time!!


Right
cowl, left cowl, right fender, and left fender, with body lead
applied.
So, another week is gone by and a few
things have happened. Front fenders are in place
and the front
wheel wells have gotten their layer of rust protection. I had to do
something
while waiting for the Easter holidays to end so I can
get my remanufactured injection pump.
Oh yes, I removed the
injectionpump, no pleasant thing to do. Mucho worko....

The
Stanadyne DB2 bad, bad, bad injection pump.
Not to get too gloomy, let's take a look at the fenders and other stuff...


Right
and left front fenders in place.
I did give the fenders and the inner
wheel wells a good spraying with rust protection
before I mounted
them. Thick black goo that never dries up completely and is a h*ll
to
get out of the hair, once it got there....


Inside
right and left wheel wells. Fuel filler visible on the right.
I also did some electrical work.
Cleaned up the auxillary electrics they put in when
it became an
ambulance, i.e. ripped the wires to sirens and flashlights. I also
had to build a new fuse panel, and at that point I decided to
incorporate the two
extra fusepanels for the ambulance stuff into
the new glove box mounted panel.
The fuse layout is the standard
IH, at least the upper five fuses on both sides.
Lower three
fuses on each side are custom. Looks quite nice, eh?

New
fuse panel.
I also assembled the wiper controls.
As I stated before, the chebby electronics
provide ground to the
wiper motor which is on a constant hot feed. Exactly the
opposite
of the IH. Qute. So, I had to come up with a two relay design to
interface
the two. Oh, by the way, the IH wiring of the wiper
motor is a little weird.
Green wire is the park lead, always
hot.
Black AND red wired together to + gives slow speed.
Black
wire to +, and red wire open gives high speed.
Well, when I got that right it was no problem. Looks like this:

Wiper
control box and interfacing relays.
Well, just had to update with a
picture of the new injection pump. I was lucky to get the wrong
pump,
a 4520 instead of the 4503 that i returned. Better pump, used in
military applications
and HD trucks. Looks like this when I
finally got it in place:

The
new budget buster...
Lots of things have happened since
the last update. I've been too busy to fixup this page,
but I'll
try to get some of it done now. No pictures available yet, but I'll
do that too, later.
First of all, I finished installing
the new injection pump. Whoa, what a pain that was! The
fuellines
don't install easy... But I got it started... After a few days of
intense work.... I had to
remove the mechanical lift pump and
install an electric at the tank. Oh, did I mention that the
tank
had a couple of small pinhole leaks? So, down with the tank again,
flush it with acid and
seal it with polyurethane paint. So, now
the tank is bright red inside... Nice!
Well, at least it runs. First it ran
like crap, hopping and bobbing, no idle, and a bad smell of
unburned
diesel. Found out that one injector was loose. After tightening it
the engine runs
smoother, but still not 100%. Will tune it
later...
I've also sprayed rust protection inside all hollow places, like rockers and A,B, and C posts.
Now it's down on its own wheels! And
it moves. For now it has been driven a couple of yards
back, and
the same distance forward. Not much, especially when considering that
it is what
it has been driven over the last 25 years!


She's
outside! By her own power!
Found out that the radiator was
shot. It looked good, and seemed good until antifreeze
started to
pee out of the cells when the level approached the ”full”
mark... Time for a re-core!
Brought the rad to a shop yesterday,
and will be getting it back Friday. Another budget buster.
So, what to do while waiting for the
radiator? I hate waiting. I started on the interior...
First thing
was to toss the seats, them old '60-ies Volvo seats looked fairly
good, but I want
something more comfortable. Will go junk yard
hunting for seats pretty soon. Anyway, with
the seats out, I
trashed the old center console, enabeling me to get the floor mats
out.
This revealed some floor rust, but nothing serious. A few
strokes with the wirebrush on
the angle grinder took care of
that, and then two generous coats of white roofing paint, to
make
the floorpans like new and protected for ever...
Guess it is time
to go shopping for materials for a new center console, and some sound
proofing stuff. Me likes a quiet ride.....

Roofing
shingles as sound proofing material!
Roofing shingles are the same
material as the expensive sound deadener plates that
you can buy
at automotive stores. Except they have that coating with sand, and
they're
a lot cheaper. I will pad the shingles with some closed
cell foam before the carpet goes
on.
I've also ripped out the divider
between the driver compartment and the back. Very solid
thing,
made of ¾” plywood, polsterd
with foam, and clad with ugly green vinyl. I retained
the lower
10” of it, and the upper 6” of it. In the lower part
there is the aux heater, and the
front seatbelts are anchored
there too. The upper 6” contain a nifty locker, using the space
above the front seats.
Got the radiator back from the
radshop. I had them recore it with a 3 row core, instead of
he
two row original one. Had to haggle a bit to get the price down to an
affordable level...
Anyhow, it is installed and it seems like it's
holding up.
Well, well, well... Time for a new
update! I haven't been feeling so good these last weeks
and thus
not done so very much. Anyhow, I have done the new center console,
and painted
the pieces that I left of the divider between the
driver compartment and the back with
black vinyl paint. I just
can't stand that ugly green (I call it ”prison green”)
color.
Black is beautiful though.... Picture time!

Center
console, padded and clad with black fake leather.
Still missing
the doors for the storage bins.
The center console is made of ¼”
plywood and has space for a switch panel, radio/cd,
dvd
player/back-up camera monitor. Plus cup holders and lockable storage
facility.
Quite nice, if I may say so.
Ah, just for shit and giggles, here is the junk pile my mom is pissed off about...

One
of the small junkpiles...
Well, time has passed and I'm still
not very far in the paint job preparations.
That might be because
I've all those domestic things to do for my upcoming
5:th wedding
anniversary... Got a long list from the significant other, and
that
means no play in the garage.
But on
the other hand, I've at last gotten off my big butt and orderd a
hydraboost
brake booster. During my short excursions with the ol'
girl I quickly came to
the conclusion that the vacuum booster was
shot. Or the vacuum pump, or both.
Best thing to do? Convert to
hydraboost! Can't wait till it arrives!
So, the
hydraboost has arrived and is in place. Ofcourse I forgot to bring
the
camera, so pics will be of the booster installed.... Here
they are:


Right
and left view of Hydraboost and master brake cylinder.
As you
can see, I used the mountingplate from the '99 Suburban the unit came
from, and just drilled two new mounting holes. The new ones are
the lower ones,
that center together with the large hole for the
pushrod.
The pushrod was about an inch short so I had to weld on
an ear to make the brake
pedal get to the normal height.
Otherwise there were no big problems.
Hoses are also from the
suburban. I had to rebend the preassure hose at the
pump
connection, and change the OEM fitting at the steering box end to a
banjo.
Paintprep
is coming on fine though. As the lazy bum I am, I got me some
help
with the most boring parts of the prep work, the sanding. For
a while I have my
personal little 19 year old slave, who is very
good at saying ”Yes massa”, ”No
massa”,
and ”F*ck you massa”. He's quite good though, and with a
little
practise he could be a good bodyman. Some pics to show
it....


Sebastian
(a.k.a. the slave) with the disc sander...
The roof
has curves that go in all kind of directions so it is extremely
difficult
to get a nice, even finish on it. It takes a lot of
sanding, and a lot of applications
of filler to get it right...


Paint
prep coming on nicely...
When we
thought that the roof looked okay, it was time to shoot some primer
on it. I used a marine application epoxy primer that probably
will last forever.
A good thing with epoxy primers is that you
can use bodyfiller on top of it if
neccesary, whereas you can't on
a washprimer.
This is how it looks with the roof primed....


Roof
primed. Got quite late that night....
Looking
at it in daylight revealed some small blisters, and a couple of
places that
need more filler and sanding... Good thing I used an
epoxy...
Haven't
done much lately besides a little bodywork, but I have kept busy in
finding
parts for a front disc brake conversion. It will happen
when I get all the parts together
and have the time to do it. Will
do a complete write-up on the conversion and post
it here and on
the Binder Bulletin.
So, today
I finally put some paint on the top. Bright red. Just the right
ambulance color!
It didnt turn out as good as I wanted, but what
does? Atleast it's nice and shiny, with
a couple of dead bugs in
it. As for a garage paint job, it turned out fairly well.
These
couple of pictures got snapped by my sister. These two first ones
without my
knowledge (until I saw the flash...). Let's see how
they come out....


Me
at work... After painting you have to clean the gun. God am I getting
old... :)
So, how
did it turn out? Well, there's a pic of it while drying... The second
picture is
what my sister scooped off the top of the outdoor
fishtank.... If her fishes die, she'll
probably hate me...
The
dome that's on the hood is the cap for the ventilator on the rear
part of the roof.


Nice
new shiny red top on the T'all... Not so nice red stuff on top of
fish tank...
So, it's been a while since the last
update. Not that I haven't been busy fixing things
on the old
girl, but those things don't show up on pictures. But today, finally,
I've shot
the primer. Some minor visible scuffs are still there,
but I will attend to them tomorrow.


Front
and rear pictures when primed.
Well, two more pics to go... Looking
closer at the primer revealed some spots where
the primer had
reacted with the surface and loosend a bit. Nothing much. Worse is
that
I got the dreaded orange-peel, which means that I have to
wet-sand the whole thing!
I really, really hate it! That's for
testing out a new primer that I had never used before.


Left
and right side pictures when primed.
At least I didn't make anything run
away in the primer. So, I guess it's just to start the
wet-sanding
and shed a tear or two...
Six hours of wet-sanding... Finished!
But it took its toll on my hands. Now they look
like the hands of
a cleaning lady, with the skin worn down so far that two of my
fingertips
started to bleed. Not funny at all....
Anyhow, now it's ready for a wash
with prep-sol and then the final coat of paint! This will
happen
this weekend, that is if I'm not getting some time and do it on a
week night....
Shot the paint today... Phew! There
will be pictures after the weekend as I don't have
time to take
them right now, not to mention that I (as always) forgot the camera
when
I went out to do the work. From what I could see half an hour
after shooting the final
coat, there are a couple of ”run-aways”,
but those will be easily fixed with some 800
grit wet paper and
some polish. I just don't do this often enough to be able to shoot
a
perfect paintjob...
So, let's see some pictures!!


Looking
good from the front... Engine compartment not messed up either...


Not
too bad at all, eh?
Okay, two more pictures, then we call
it the day. Still lots of things to do, like all of the
interior,
assembling the exterior, and getting 'er inspected!


Now there's a little more to do
paintwise, a few toch-ups, some small spots to wet-sand and
polish,
and a some places to use rubbing and polish... But all in all, she
looks a lot better now
than when I brought her home!
Time passes and she's coming together
piece by piece. No pics yet, but now she has gotten
tail lights,
front lights, turn signals, and a front bumper. Still looking good,
or even better and
better... Have some pics....


Front
and rear pictures, notice working taillights!
Today it hasn't happened much, just
threw all the junk out of the back of her, and started on the
interior a bit. That is, I emptied a can of black vinyl paint
over the ugly green stuff back there...
It'll take at least one,
maybe two more cans before all the green is gone...
Well, not much has been done the past
weeks. Mainly because we got two new puppies, and
there really
hasn't been time for anything else than getting them house trained.
Some small
things have been done though... Sound proofing of the
rear floor, some electrical gremlins got
straightened out, and a
chebby van back seat has been modified to fit.
One gremlin was
the light switch. Broken, and no doe for a new one. So, what to do?
Well, I cracked it open and fixed it with some superglue... The
connectors were loose and
just fell into the switch when it was
pulled out.
Anyhow, I'll take some pictures of
the minimal progress as soon as I remember to take the
camera to
the garage...
So, it has been Christmas... There
was no way for Santa to fit a Scout down my stocking, but
my
sister didn't hesitate to use her imagination to get me the best
Christmas present this year!
She made me a ”Travelall
Emergency case” that I just have to share some pics of...


The
ultimate X-mas present! A Travelall Emergency Case.
What about my Travelall... Has
anything happened? Oh YES!
All lights are working, All major
things needed for the safety inspection are there. Now it's
time
to get insurance and a safety inspection. Pics will follow later
today....
Yes, today is picture time again, and
while this ”today” is a few days off from the ”today”
in the last paragraph, I'll throw in a couple extras.
So, I took her for a small test drive
today... Almost everything is honky-dory, just have to
do some
minor adjustments and fill some ATF into the tranny. It's slipping,
and oil level is
quite low. Oh, another thing that has to be done
is to spray some rust protection inside
the doors and on a few
places beneath.
Lets have some pics!


It
was getting dark but these pics show working lights...


Starts
to look good, both outside and inside... Should be enough space for
the dogs...
The back seat is a slightly modyfied back seat from my
chebby van.


Still
a little to do here, but that'll happen later.
Did some small things today like
spraying rust protection inside the doors, and
measure up the
side view mirrors. The mirrors, by the way, are West Coast style
and
need to be narrowed about 4 inches to look good. Pics are coming!
I also got the old girl insured, got
it registerd for road traffic, and got an appointment
for a safety
inspection. The date is set to February 1. May the force be with
me...
Oh, just remembered... I have to take
a look at the windshield wipers. They make
an awful lot of noise
and behave slightly erratic. Well, plenty of time for that....
Time flies, and I've finally gotten a
job (part time), so things haven't moved along as
fast as I would
like.... Had to make new brackets for the side view mirrors, but now
as they're finished all there's left to do is mounting them and
the mirrors. The recepie
for new brackets for west coast style
mirrors is:
One angle grinder, A drill press, A hack saw, and four
Volvo door latches.
Pictures later...
Still on the to-do list: Brake
adjustment, brake test, driving lights adjustment, and a
quart or
two of ATF for the tranny. It will be ready for Feb 1.
Finally some pictures! Had to borrow my sisters camera as I, as usual, forgot mine...


Just
missing the hub caps and some minor trim.
Side view mirrors in place, brakes
adjusted, and two quarts of ATF filled. Still needs
a couple of
quarts... Have to buy some more tomorrow!
Oh, by the way, for those of you who
like videos, here are two short clips courtesy of
my sister Nina:
Getting
out of the den...
Passing
by...
So, today, the first of February, I
went to the dreaded safety inspektion. She almost passed,
hadn't
it been for a couple of minor things. The horn decided to die over
the night before the
inspection, and I hadn't time to fix it as
the inspection was at 06:50.
The right rear door decided to lock
up completely and refused to open.
Right front brake hose is
routed badly.
The dimmer switch on the steering column needs to be
adjusted.
The steering gear mounting bracket needs to get beefed
up, as the gear moves slightly.
Five small things, of which three
really should have been fixed earlier. Mea Culpa.
Anyhow, I got a
month to fix it and re-inspect. No big deal.
There's still some detailing to do,
so this page will still be updated. More pictures are coming,
But
Halleluja... At last I can drive it without looking over the shoulder
for the boys in blue...
So, safety inspection is passed, and
I got the sticker telling that it is inspected and all taxes
(what
tax? She's tax exempt) are paid. Right now this old girl is working
as my daily means of
transportation and she does that well.
Yesterday I went for a roundtrip of about 200 miles to
pick up
some stuff for my other IH, the battered bitch... Got about 24 miles
per gallon
(10 litres/100 km) and that's pretty good for a 2.2
ton brick at 75 mph.
I also picked up the hub caps, and
got some weather striping on her. No more gulps of rain
water
sloshing in when I turn, and much less wind noise from the doors.
Pics right here...


Hubcaps
do a difference, and so does some rubber!
March 16, the day the old girl got
its new shoes. Not really like Cinderella, no nice glass
shoes.
She's a little more macho than that, so she got four new Cooper ATR
in the size
235/75-15, reinforced, 6 ply rated tires. All of them
mounted on the freshly painted steel
rims that hosted the totally
worn out , cracked, and molested Michelins that came with her.
Now
she rolls nice and smooth! Me likes!
March 19, had to get a new
alternator... Ofcourse I had forgotten what a hellish task it is
to
change the alt on a 6.2. On the other hand, I'm happy it wasn't on a
chebby van, they're
even worse to work on. Anyhow, after an hour
of cursing it was done
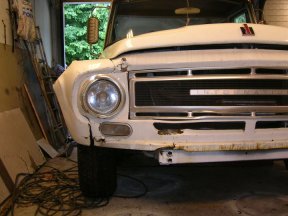
July 4. This was a bad day for the
old girl... I rear-ended a cop car with her. Not really a good
thing
to do, but when doing a thing like that, why don't do it proper...
Pics below.
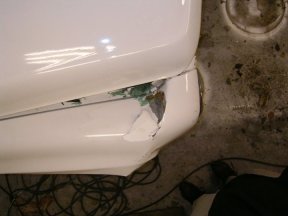
The
joint between front and fender measured 10 inches further back than
before....
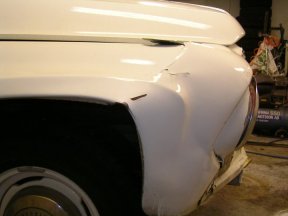
Here
you see the damage even better...
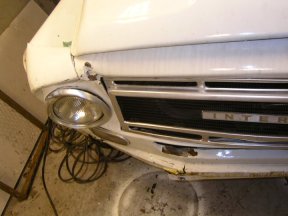
And before you ask, YES, I had a
bumper in place. Sadly I didn't hit the other guy square,
then
the bumper would have protected the sheet metal much better. Pics of
bumper below...
Bumper
got it as bad as the sheet metal. Pretty twisted, huh?
There's nothing bad that doesn't have
something good in it... Now I get to do those small
things that I
should've done a long time ago. And, as I have full coverage
insurance, I'll get
a wad of cash from the insurance company to
cover the damages.
The sad part is that I can't do much before
they're finished deciding what and how much
they'll throw my
way....
Aug 3, 2007.
Well, the insurance
company seems to stall things and I have no time to wait any
more...
I've started to fix the old girl and am making good
progress. I'll have to hurry a bit though,
because Aug 18 I'm off
to a gathering of old trucks, and a few days after that the old girl
is probably going to be used in a movie... This is severly cool!
Aug 7, 2007.
The insurance company
has inspected the old girl and I get a bag of shiny coins. Enough
to
make a small profit as well as covering the damaged parts. Not much,
but I'm happy.
Aug 10, 2007.
Yippie! Now she's
rolling again. Drove her home again and almost everything is
peachy.
I still need to find a nice bumper and a new beezel for
the right hand driving light. But I think
I'll manage to do
that...
What an awesome feeling it was cruising the freeway
again!
Aug 11, 2007.
The old girl just
died on med today.... On the freeway. Seems to bet the fuel shut off
solenoid
that has gone south, and that's a very odd thing
considering the injection pump is newly
rebuilt. It's just been
there for 18 months or so, so I'll complain loudly to the rebuilder
tomorrow.
Aug 15, 2007.
Well, it wasn't the
fuel shut off solenoid. The whole pump has seized and the axle in it
has
broken. This means I'll have to get another pump... I'll pick
it up tomorrow and spend the
night installing it....
Aug 18, 2007.
Went
to one of the largest gatherings/show of old trucks here in Sweden...
Pärlrallyt. Had a
blast and met a lot of new interesting
characters. Very nice, very well organized, and we had
a nice
drive through the country side. Pictures located right
here...
Aug 21,
2007.
Well, today the old girl was in a movie! Really cool, and a
very nice experience for me. Met
lots of nice people and got a
good insight of how it is on the set.
Pictures on a separate
page, right
here....
Feb 20, 2008.
Long time since the
last update, but the old girl has done good service in the mean time.
I've
also been busy with other stuff, like Xmas and birthday
number 40 of my significant other.
So, a couple of weeks ago one
of the bolts holding the starter broke. Had to tow the old girl
back
to the garage and drill out the broken bolt. No fun at all as it was
a 12.9 quality bolt.
Thus no pictures of it.
While at it I also changed the left
side strut rod bushings. The old ones were just junk as you
can
see in the picture below. But after 40 years I think it is okay for a
rubber bushing to be
worn out.


Old
and new strut rod bushing. Click on images for a better view!
I also swapped four injectors to new
ones. This made quite a difference in how that old engine
runs.
Now its quieter and smoother. Still four more to go and with some
luck most of the noises
will go away.
Mar 1, 2008.
Swapped the other
four injectors and it made quite a difference. Now she runs smoother
with
less noise, and starts better too. Still some work to do with
sound proofing, have to fab a sound
baffle under the dash and
then it's all the window seals.... Well, that'll happen, but not any
time
soon. Sadly, but true.
June ,26, 2008.
Nothing much has
happened to this old girl, but that will change soon. She's doing
good
service as my daily driver but a little noisy and nu fun to
fill her up with fuel. It spews over in a
second and it feels
like it takes all day to fuel her up.
So, upcoming changes are:
- Newer
engine (1991) that is a lot quieter.
- Newly rebuilt TH700R4
transmission.
- New 30 gallon fuel tank in the rear, between frame
rails.
- Custom filler neck molded into the rear quarter.
- All
new gauges from Dakota Digital.
Engine and tranny is the first thing
to happen, hopefully in a few days. The new fuel tank and filler
needs some custom work, like narrowing the tank two inches to fit
between the frame rails.
July 1, 2008.
Started out on the
engine/tranny swap today. Or really, I started a couple of days ago
when I got
the old girl into the garage. Anyhow, I was thinking
about removing the tranny from underneath and
just remove the hood
and lift the engine straight up. Today, after getting the tranny off
I realized that
I would never get it re-assembled again this way.
Too many things that are too tightly fitted and I'm
not a very
tiny guy...
So, I had to take the biscuit and remove the front
clip. I wish I had done it when I started the swap, it
would have
saved me a lot of time and frustration.
Looks
kinda familiar? Been there, done that...
With the front clip off, less than 30
bolts and only half an hours work, everything is accessible and
it
will be a breeze to get the engine out, and the new engine and
tranny in. While engine and tranny is
out I'll clean up the
electrical system even further, and I'll install a manual glow plug
system instead
of the magical electronic piece of junk that
resides there now.
Aug 6, 2008
Been working on the
old girl on and off and thought it was time for an update... Engine
and tranny
swap is now complete, as far as the heavy stuff is.
Some details are still in the works like a new
water pump. The
old one developed a nice leak while the engine sat on the floor for a
while.
Dumping the the engine and tranny in
was no big deal. Changing the tranny mount was easy too.
But the
new tranny mount was a little different than the old so I had to shim
it to get the tranny in the
right place. This resulted in the fan
hitting the fan shroud, so I just took it off. Taking off the fan
shroud
made me have to move the power steering reservoir as it was
mounted on the shroud... Well, I guess
you get the idea...
The new glow plug relay (really, a
ford starter relay) is in place and hooked up. Now, as the lazy bum
I am, I have to build a timer for the glowplugs. As I have the
self regulating AC60G glow plugs, it will
be a pretty simple
device that just gives about 10 seconds of glow when ever the key is
turned on.
Maybe I'll add a temperature sensing device later.
Really, I should do it now as it's only the fitting of
a NTC
resistor in the timing circuit... I am a lazy bum...
As the new tranny has an electronic
VSS (vehicle speed sensor) and the speedo of this old girl is
mechanic, I will have to tuck those new gages in now too. Most of
them are in already but the speedo
is left to do. It has to be
calibrated by driving exactly one mile, so I'll have to measure that
distance up
on a quiet road and calibrate. Wires for the new
speedo are in.
In the end it's probably worth all
the hassle it has been. I have had her started up with the new
engine,
and boy does it run sweet! Though it took a whiff of ether
and an over night charge of the batteries to
get it started...
Tomorrow I'll probably sneak out of
work and start tearing off the leaking waterpump... If all goes
well
I might even get the new one installed!
August 8, 2008.
Nothing much to do
at work so I used my lunch hour (and a little more) to tear off the
broken water
pump. This is no easy task on those 6.2's... It
includes removing the power steering pump with bracket,
the
alternator with its brackets, and the timing cover plate as the water
pump also is bolted from the
rear side of that plate... And the
oil filler tube, and some minor stuff. Anyhow, the deed is done.
August 10, 2008.
Finally I got the
new waterpump installed, and a few other things done too. New gauge
cluster is
installed and the new speedo is calibrated. Looks
quite nice!

Not
the best picture but you get the idea...
A push button for the glow plugs is
installed. Completely manual system, as the timer I built didn't
work
as I wanted it to. The timer works, but my intention was that
it should activate it self every time got a
12 volts feed. It
didn't, so I have to re-design it... Anyhow, the glow plug system
works.
I also did a short test drive with
the new engine... This engine rocks!! I never thought it would be
so
much difference between the old beater 6.2 and this newer
engine with only 200.000 miles on the
odometer. With this engine
you have to be very easy on the throttle...
Still left to do before I'll consider
her drivable again is to check the power steering hoses and to
mount
the front bumper.
After that I'll start measuring and thinking
about the 30 gallon fuel tank, but will have to wait a while.
September 6, 2008.
Just a minor
update this time. I did some basic maintenance today, like a new fuel
filter and checked
the basic fluid levels, getting ready for the
2nd Annual Johnnie Reb Run next weekend. Still need to
check transmission fluid level but I'll save that for tomorrow
when I'll take her for a longer test drive.
November 21, 2008.
Today I gutted
the fuel tank from the ”Battered Bitch” to seal it off
and put in a slosh guard for the
fuel level sender. I found that
there already is a slosh guard for the fuel pick-up, but the fuel
sender
is outside of that, so I just bent some sheet metal into a
new one and welded it in place.
The new digital instruments fuel
level gauge really needs this as it is too sensitive... It jumps
between
full and empty like crazy when fuel level drops below 65%.
The fuel tanks shape does not help this
either, as it is narrow,
thin, and very long... Enjoy the pictures!


Fuel
tank and a close up of the new slosh guard.
The tank itself is
in great shape, except for a couple of holes from when someone used
too long
screws in a couple of places. Well, the magic welder took
care of that, and everything is sealed
up with body lead so there
should be no leaks anymore....
December 13, 2008.
The old girl
finally got a nice pair of new shocks. It was a pain to get them,
they were not cheap, but
they were a breeze to install. Now she
handles a lot more comfortably and feels a lot safer to drive.

New
and shiny front shocks...
Januari 13, 2009.
Just a short
update to remind myself that I'm alive and have to do some work on
these pages agin.
Or, rather, do some work on the old ambulance so
I can make a real update again...
The old girl has made real good work
as my daily driver this far and it is soon time for the bi-annual
safety inspection again. I don't think there will be any big
issues, I'll probably just have to fill up the
winshield washer
and adjust the running lights to pass. But one never knows...
Upcoming things on the to do list are
to change out the clutched fan to a smaller flex fan. This is so I
can get the right angles on the drive shaft. To get there I need
to raise the rear end of the transmission
about an inch and that
would make the fan hit the lower radiator hose. Thus the flex fan. I
got all the
kit I need to do it, so I wonder why I'm not at it
right now.

![]()
Flex
fan and fan spacer.
I also need to get the new fuel
filter assembly installed. This CAV / Lucas filter unit will replace
the
GM secondary filter which is crapping out on me by starting to
leak in various places. All I need to do
this is a couple of hose
barbs and I'll try to get them today.


New
Diesel filter assembly and hose barbs.
Oh, I almost forgot... It has been
Christmas! I'll make an Xmas 2008 page and put it up as soon as
I
can... But there are two things that the American Santa brought me
(thanks to my sister for carrying
allt that stuff through airports
and customs. Sis, love ya!).
First off is a spacer for the flex
fan. Strange thing is that I couldn't get one that fit here in
Sweden, no one
seemed to care to stock a spacer with a ¾
inch hole for the water pump axle. But finally I found one and
my
very nice sister agreed to carry it home for me.
Secondly I got a
complete set of weather striping for the doors of the ambulance. This
will also have to
be istalled pretty soon, and as such it is on
the to do list. Right now there's a lot of wind noise and I
like
a quiet ride...

Complete
kit of door glass weather striping.
January 16, 2009.
The old girl
passed the safety inspection today with flying colors!
Not a
thing went wrong, everything was working as supposed, and I had a
nice long chat with the
safety inspectors. Couldn't be better!
There are still things left on the to-do list though, so there's no rest for the wicked!
April 23, 2009.
Today I finally got to strike some things off of the to-do list... I installed the flexi fan, which was a lot more
work that I first anticipated. I had to fab up new pin bolts as it was impossible to use bolts and nuts to fit the
fan and spacer. Anyway, now it's done and it works perfectly. I was kinda afraid it would be a lot louder than the
clutched fan, but contrary, it's quiter. Good thing.
The fan install enabled me to raise the rear of the tranny about an inch, which was just what was needed to get the
drive line angles right. I also found a wheight on the drive shaft that wasn't supposed to be there, and with that
removed the nasty vibration I had at around 65 mph was gone! Nice!
I also managed to tighten up the torsion bars about half a turn. It's a lot stiffer now and that's a good thing
too. Now the suspension hold up much better when going over speed bumps.
So, all in all, today was a great day! Tomorrow I'll probably swap the fuel filter assembly, and, if time permits,
I'll swap the fuel tank too. But I'm satisfied if I get one of those things done...
April 24, 2009.
None of the things above did happen today... Simply because I hadn't the guts to start on a bigger job when I had
to use the truck about in the middle of the time I had to my disposal. So, both the tank swap and the fuel filter
swap have to wait a bit more.
So, what did I do this nice and sunny day? Well, I managed to drain the TH700R4 of tranny fluid, and I managed to
fabricate a special tool needed to take off and put back the servo cover of the TH700R4. Now I only have to fab up
a tool to remove the front oil pump too. This is a simple one though so it shouldn't take long. These tools will
aid me in rebuilding the tranny I have on the floor, which will go into my other Travelall, The Battered Bitch.
More on this subject is coming in the appropriate build-up page ('64 Travelall) later.
April 27, 2009.
Ah, at last another thing to strike off the to-do list... Today I installed the new fuel filter assembly! It was a
heck of a lot more work than I first thought, but alas, now it's done.
To install it I had to remove the intake manifold just to get to the hose connecting the injection pump to the old
filter. While down there in the valley I removed the old OEM fuel line from the mechanical lift pump to the old
filter, and fabricated a new hard fuel line from the injection pump that ended outside the intake runners. This
made the installation of the fuel hose to the filter a lot easier and it's good for maintenance also. Anyhow, the
old hose was just 1/4 inch while the new one is 5/16 inch, so I had to do some fab work anyway...
A short bleed of the fuel system later she's roaring down the road as she should! It was a royal pain to get it
done, but well worth it, considering I now have a fuel system without leaks.

Fuel filter in place.
April 28, 2009.
Had a couple of hours of IH time today. Not enough to make the fuel tank replacement, so I started out on the
weather striping that I got for X-mas. I began with the driver side rear side door, and it took me a full couple
of hours to get it done... That is, it's not quite done yet, I still have the outside chrome molding to do. The
reason I didn't get it done is that I knicked it badly while removing it, but luckily I got spares.
The shop manual says "pry off molding" and refers to a blurry picture where someone prys it off with a screw driver
and it looks quite easy. Not so. Anyhow, theres a lot of paint on the spare one and I had no stripper available, so
it has to wait until tomorrow.
Oh yeah, my alternator seems to have crapped out on me also. I might be a wiring issue, like a breach on the
voltage sensing wire, but I'm not taking any bets on that... I've had too many alternators dieing on me to do that.
We'll see tomorrow what gives.
April 29, 2009.
Yep, it was the alt crapping out. Luckily I had one on the other engine, the one that's going into the '64, so I
could postpone the cost of getting a new one. Good thing this is a bigger one, 105 amps instead of 63.
I also did the weather striping on the chrome molding... This is the most idiotic construction I've ever seen. The
weather striping is fixed to the molding with something that looks like over grown stapels, and getting them bent
inside a tiny space in a wimsey chrome molding is just a big pain...

Staples and chrome molding with old staple left.
I will skip doing that one on the other side, it's simply not worth the time and effort to remove chrome molding,
remove old stapel clips, going through hell installing the new clips, and then get the molding on without breaking
it. Won't do that again. Front doors are much easier, regular push trough clips on the weaterstriping there.
April 30, 2009.
Did the other rear side door weather striping today. It only took one and a half hour from start to finish, to be
compared with the five hours it took on the other side. But this time I skipped over the outer seal on the chrome
molding. Guess that did the time save....
More workee tomorrow!
May 1, 2009.
Workers unite! Today we work a day with out pay to make comrade whatever happy... Nah... Didn't think so...
Though I got some things done today anyway. I swapped in the other fuel tank, the one I made a slosh guard in. At
first everything went honky-dory, I made good time getting the old tank out and draining it of the five gallons of
diesel that was left in it. No surprises, everything went fine. I moved the fuel level sender from the old tank to
the new one as the one in it was a bit suspicious and then I started to jack the tank up between the frame and the
rocker. It seemed to fit a lot tighter than the old one and I had a heck of a job to get the hoses on. The filler
hose was the worst, but finally I managed to get it right. So, up with the steel bands that keep the tank from
falling down, and tighten the bolts.
Now we have come to the more exciting part of the job, that is filling the five gallons of diesel back into the new
fuel tank. After two gallons I hear a drip-drip-drip.... Awww.. Shucks. I took a look and saw it was right at the
drain, so I tightend the drain plug. Drip-drip-drip... What the he... Ah, the old copper gasket on the drain plug
didn't look so good... Well, I changed it, no problems... Drip-drip-drip... Uh-oh... [censored]
Looking real close at the area right beside the drain plug I spotted a hole, not even pin sized. The clock was
ticking and I had not time to remove the tank and fix it properly by welding it shut... So, I made a temporary fix
by taking a sheet metal screw, made a gasket of some fuel hose, coated the stuff in Permatex, and screwed it right
throgh the pin hole. Presto, no more leak.
I know I have to fix it permanently later, but not right now. I'm kinda tired of getting drenched in diesel. I'll
take care of it later.
So, how does the slosh guard work? Well, with only five gallons of fuel in the tank the fuel gauge still jumps a
little. Not nearly as much as before though. I'll fill her up one of the coming days and see how it works out when
there's more fuel in it. I think I'll dump in five gallons a time and see what happens.
More to come on this later!
May 4, 2009.
Had a couple of hours free to do something and decided I'd go for a try on the front driver side door. Same problem
as always with rusted bolts and screws, otherwise no big problems. I discovered that one felt channel, the front
one, was a bit too long so I had to cut it.
The lower glass felts wer no big problem, but I had to cut them a quarter inch too.
May 7, 2009.
Did the other side today, no bigger problems than the driver side. Good thing is that I had an opportunity to look
closely into all the doors and they are completely rust free! I like it. Must have done something right when I
sprayed them with rust protection...
Saturday and Sunday I'm off to a meet some 20 miles away. Will be a nice day trip and the weather sounds promising.
May 8, 2009.
Just went out very shortly and did some minor work. That is, I sealed the passenger side air intake in the front
cowl. Will be nice when winter comes, not to have an ice cold draft on your legs...
Rip out the glove box, some window sealer and duct tape did the trick.
I also cleaned the TH700R4 slush box on the outside, making it ready for disassembly.
May 18, 2009.
Slushbox finished, so I can start a little work on this one again. Nothing much done today except ripping the
receiver off the chebby van and started to clean it up and modifying it to fit this old girl. I'm gonna need the
towing capability soon, as our other car is up for sale.
Pictures will follow soon. The main thing fitting this receiver to the IH is to narrow it a little, otherwise it is
a perfect fit. I do think I will have to reinforce the frame a little though. I looks a little wimpy at the rear.
May 19, 2009.
Perfect fit? Bah! I really should learn to measure before I talk about "perfect fit"... So, today I cut the hitch up
to modify it. I have to shorten the main bar 5 inches on each side to make the hitch to frame mounting points fit
IH frame. I also have to elongate the pieces that are between the main bar and the frame 3 inches.
Well, I've done the most of the fabrication, now I just have to weld it all together. Thank God I have a good welder.

Hitch, main beam. Shortened to right lenght.


Original bracket and length modification.
May 21, 2009.
Today I almost got the hitch finished before I ran out of gas for the welder. Always happens on a holiday...
Anyhow, I got the pices between the frame and the main bar welded together, and I fit them to the main bar. It's a
nice tight fit and any adjusting has to be done with the tool of choise, the BFH (Big F..ing Hammer). Turns out
pretty nice, just need to adjust the width a little and get it angled straight. Then weld it, then paint it. Then,
I have to get it on the truck, and that may take some time, knowing myself. Pictures...


Assembled hitch, not yet completely welded though.
May 22, 2009.
Finished the hitch today. First I had to drive by the supply store and get a bottle of gas for the welder though.
Now I got a nice, perfectly straight hitch, ready to go on the truck. Just wonder when I'm gonna get that far...
Pics below.


Finished product. Not bad at all...
May 25, 2009.
Just slapped a thick coat of CorroFlex on the welded parts of the hitch today. Now you almost can't see it has
been chopped up and welded together again. When it's dried I'll give it another coat of black, and then on it goes.
June 4, 2009.
This last week I've rewelded that hitch three times! I wish I could learn to tack weld things up and try them in
place before doing all welds and paint the thing. Anyhow, the last time it was just tacked together and then it
decided to be a good fit. At last.
I also wire wheeled and painted the frame where the hitch attaches. Looks pretty good there now...


Latest and last version...
June 10, 2009.
The last few days I've managed to drill the holes in the frame and test fit the hitch, and today I finally bolted
it into place for good. It's been a lot more work than I anticipated but it looks really good, and the height of
the ball is perfect.
Now I just have to hook up all the electrical stuff and then go get it inspected. Oh, well, I do have to change
one bolt that I kinda trashed the threads on, but that's a piece of cake.
With some luck I'll be able to finally get my other project into the garage this weekend...
Aug 19, 2009.
Crappers! First our other car gets wrecked totally, and now the transmission in this one starts to act up. Does not
shift into fourth, no lock-up, and slips in reverse. I hate it. Got to fix this fast as we need means of transportation.
I will have to get on this ASAP even though I have a honey-do-list that is an arm and a leg long, and just as costly.
Aug 23, 2009.
Switched the transmission during the last two days... As it's almost impossible to do this from underneath I took
off the whole front clip and removed engine and tranny as one unit. A lot easier to do it this way.
While test driving I noticed that it still didn't go into lock-up, and that made me remember that there are five
different ways the lock-up can be wired from factory, and this tranny wasn't wired like the old one. Sigh.
Have to drop the pan and rewire the lock-up circuit... Dang I didn't remember to check this before installing...
Aug 25, 2009.
Dropped the tranny pan today and rewired the lock-up. Bypassed all the mumbo-jumbo and wired it to engage
as soon as the tranny goes into OD. Works like a charm!
Sep 1, 2009.
Finally, after three years of use I installed the stereo. Really, it's only half done as I still have to install the rear
speakers, and the CD changer. But at least there's some music in it now...
Sep 7, 2009.
Finally got some new seats, both front and back. I really wanted leather seats but those available at the local
pick-n-pull were either broken or the wrong color. So, I went with half leather/half fabric and scored some really
nice seats from a Volvo V70. Now I just have to install them too... This will include fabricating some bracketry and
other stuff, but no big things what I know of. Pics will follow...
Sep 8, 2009.
Got the new passenger side front seat installed. Looks great, feels great, but is a little on the high side. Don't think
it's a big problem though, more something to get used to. It was a b*tch to install, had to do completely new brackets
as the distance between the sliders were 4" wider than on the old one, beside the fact that no other measurements
were the same either...
Tomorrow I'll have a stab at the drivers seat. Can't wait to get it done so I can rest my butt in something more comfortabe
than the 42 years old Volvo seats...
Sep 9, 2009.
So, today I got the drivers seat installed. It's a little hig and I gant get it lower without cutting into the drive line hump. Guess
I'll have to learn to live with it, as with so many other things. Hey, this sounds worse than it is, actually the seats are very
comfortable and you have a great view over the ricers infront of you. I'll say it's a keeper. Looks like this....

New front seats.
I do have the matching rear seat too, collapsable, divided 1/3 and 2/3, with 3 integrated shoulder straps. It will be
a lot of work installing it but it will be done. Not today, but in a not too far away future.
This does it for this update. More pictures later! Thanks for looking so far!
Stay tuned! More to come, and very soon too!