
The revival of ”The Battered Bitch”
2007-01-26
Let
me present my new project... It all started with me getting finished
with my '67 Travelall, you know
the one you can follow the
build-up of on another page on this site... I needed some more
therapy, and
was slapped in the face with an ad on one of the IH
forums. It was for a 1964 C1200 4x4, and it was
said to be
virtually rust free... Yeah, right....
Well, anyhow, I went and looked at it,
and like always when you go look at another IH, it ends up in
your
possession. At least that is how it is for me. I just couldn't resist
it, I just had to save this battered
bitch from the previous
owners neglect and deliberate attempts to kill her. And of course,
the price was
just sooo right!
Oh, by the way, on this page I will use
smaller pictures, but you can always click on the pictures to see
a
full view. That way the page will load faster when it grows larger,
and if you want to study a picture in
detail, you can do that
too.
Another feature I added to this page is the ability to click
on the done date in the todo list below, and
get right to that
part of the page. This way you can get to the new stuff instantly
when re-visiting.
Or, you could just click here
to go to the end of the page.
So, what's on the to-do list? Well, here's a
start:
- Get her home! Done,
2007-04-17.
- Clean out inside and wash outside. Done,
2007-04-22.
- Gathering all parts needed. Started,
2007-11-03.
- New steering gear and column. Done
2008-03-22.
- Pull dents in doors and quarters. Started
2009-01-05.
- Rip off the front clip. Done
2008-04-19.
- Rip out the engine. Done
2008-05-04.
- New rockers. Done,
2009-02-18.
- Diesel engine and slush box. Started 2008-06-01.
- Fix misc rust. Started
2007-05-08.
- Hydraboost! Started
2008-03-22.
- Fix doors and broken glass. Started
2008-12-16.
- New axles, with a 4.10 ratio. Started
2009-02-06.
- New paint, fire engine red.
How's that for a start?
So, lets look at some pics now...
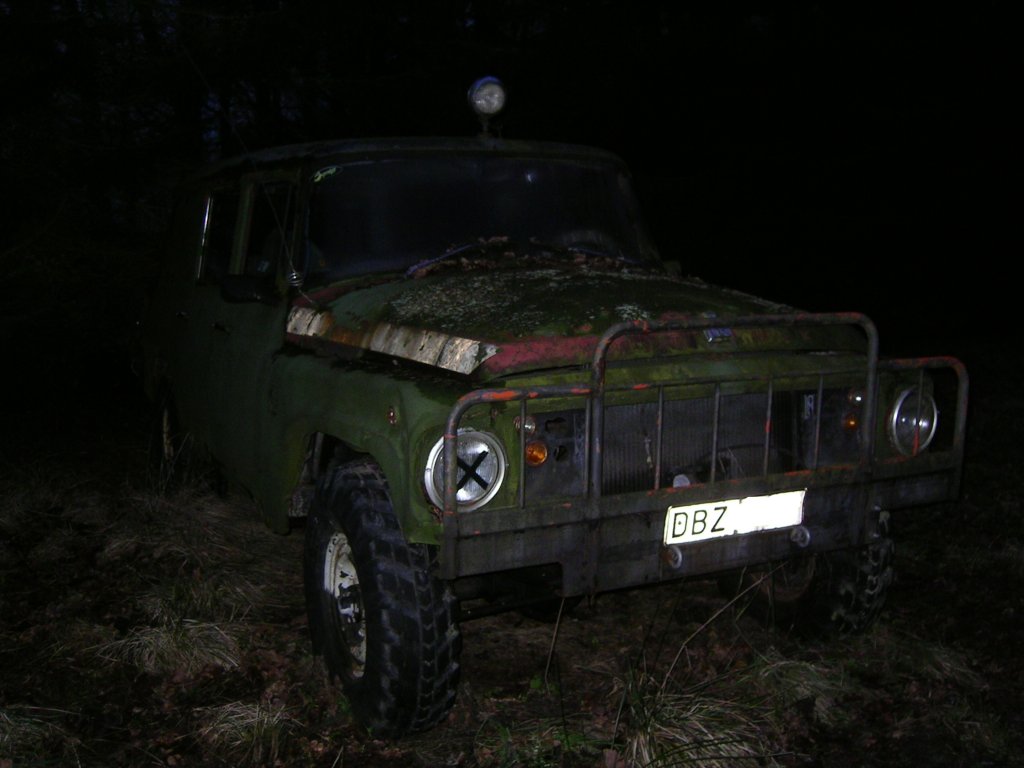

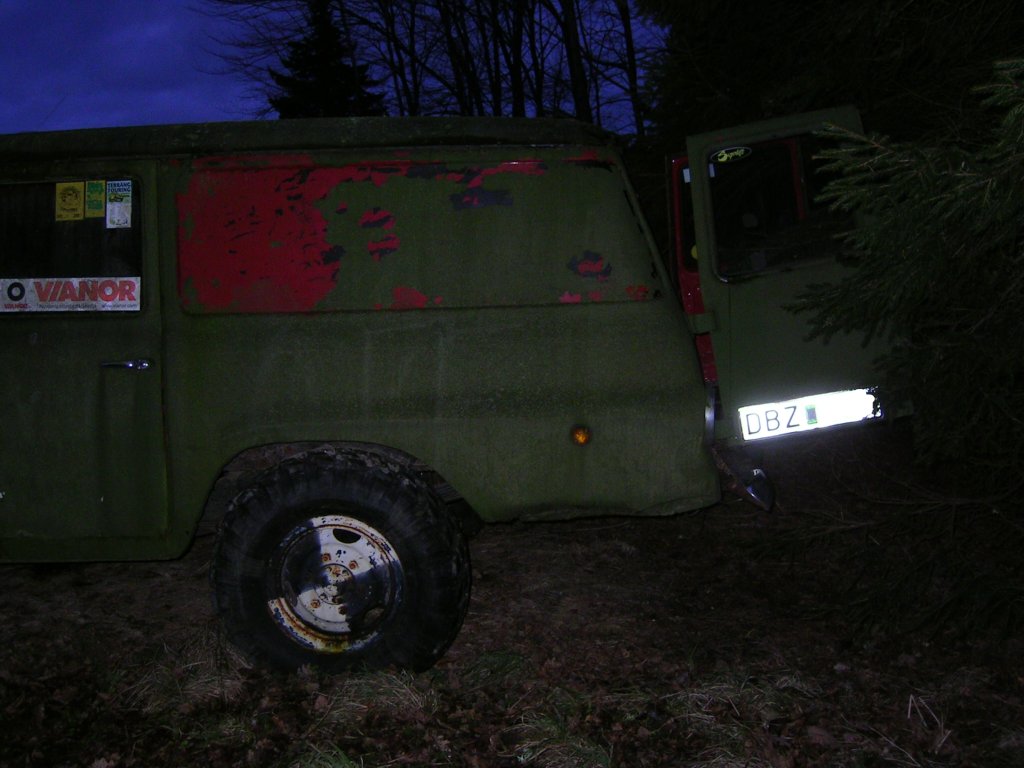
It was getting dark... But I saw all
the dents and all the rust anyway.... The green paint job is done
with
a paint roller or a large brush. I guess it's removable with
a pressure washer.
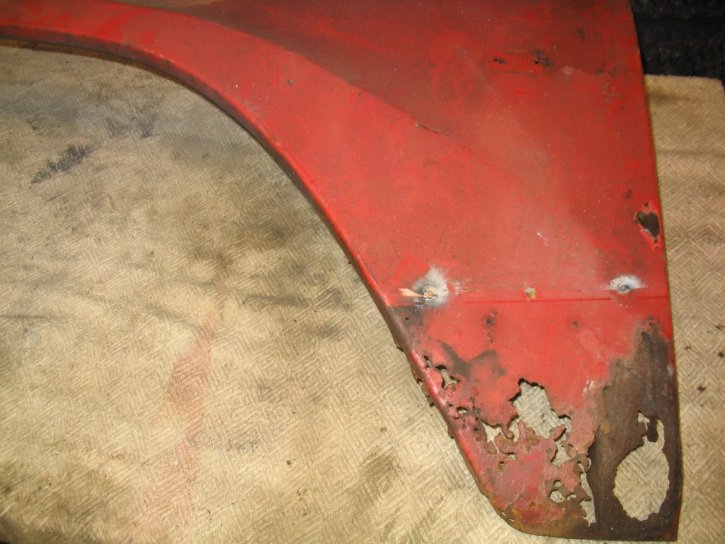
Both front fenders are severely dented, maybe
they would be usable if they weren't rusted in the rear
end. The
front is cut up to supply power to front mounted waterpump. Yeah, it
is an old rescue vehicle
used by the fire department...
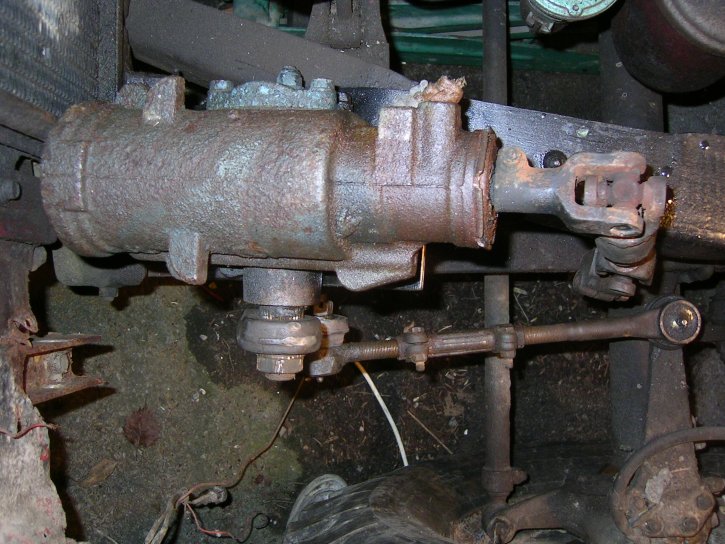
Steering box broken and
replaced with a full hydro steering. That has to go...
The front
cowl seems to be in better shape than most I've seen so far. Good
thing!

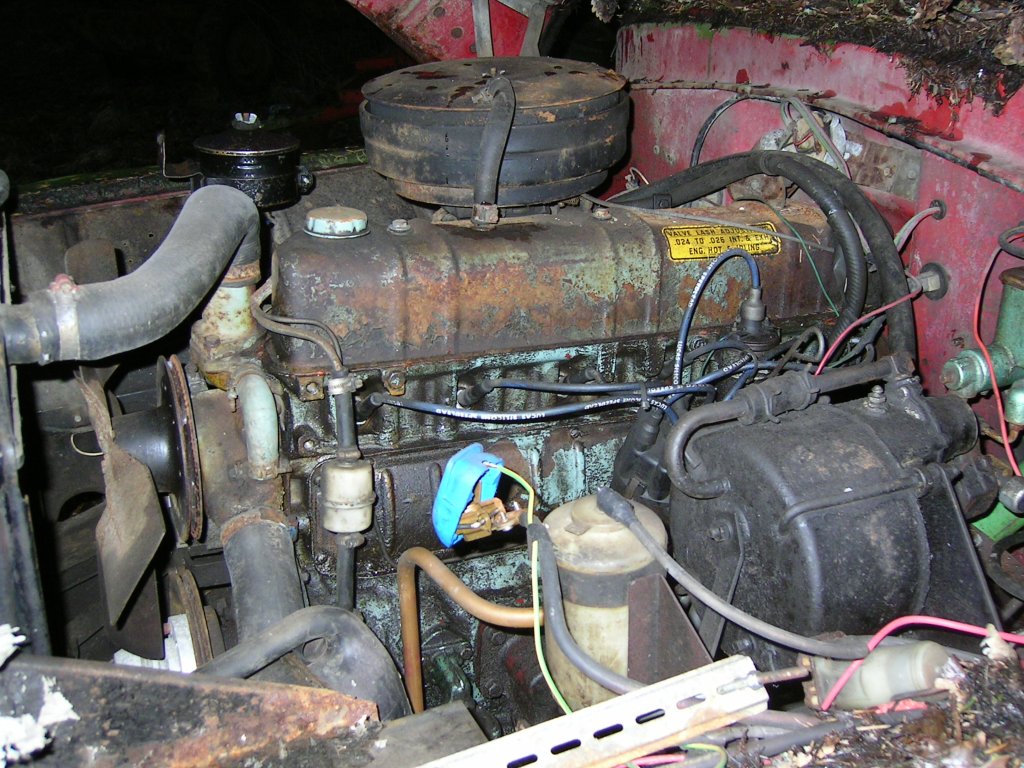
Engine bay... Oh boy,
whatta lot of redneck, home brew, back yard engineering...
Well,
at least there's a good old BG-241 there... Not for long though,
There's a Diesel coming...
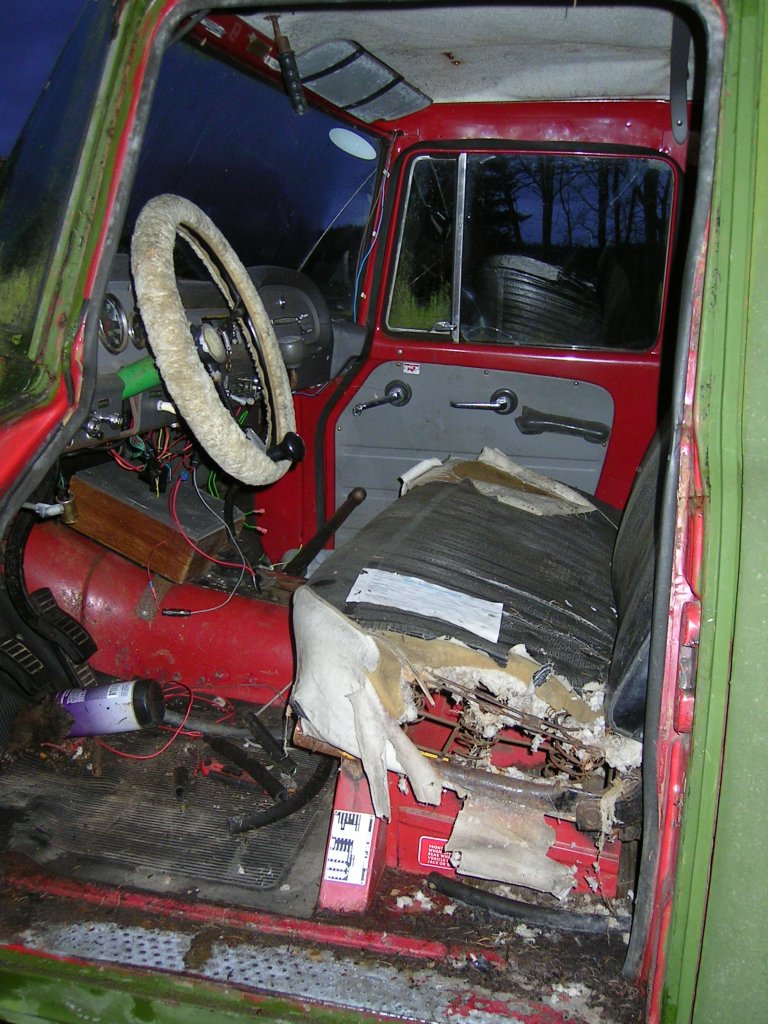
Yeah, it doesn't look too
good inside the cab. Lots and lots of junk, and some new
upholstery
is needed badly. Floors have rust in the usual places,
but that is expected in a 43 year old truck.
Left quarter is a bit
banged up after the previous previous owners attempt to do a lift,
which
made the previous owner loose the rear axle while driving...
I hate sloppy workmanship.
Wheels are the dreaded 6 lug, but that
may change as soon as I can lay my hands on other axles.
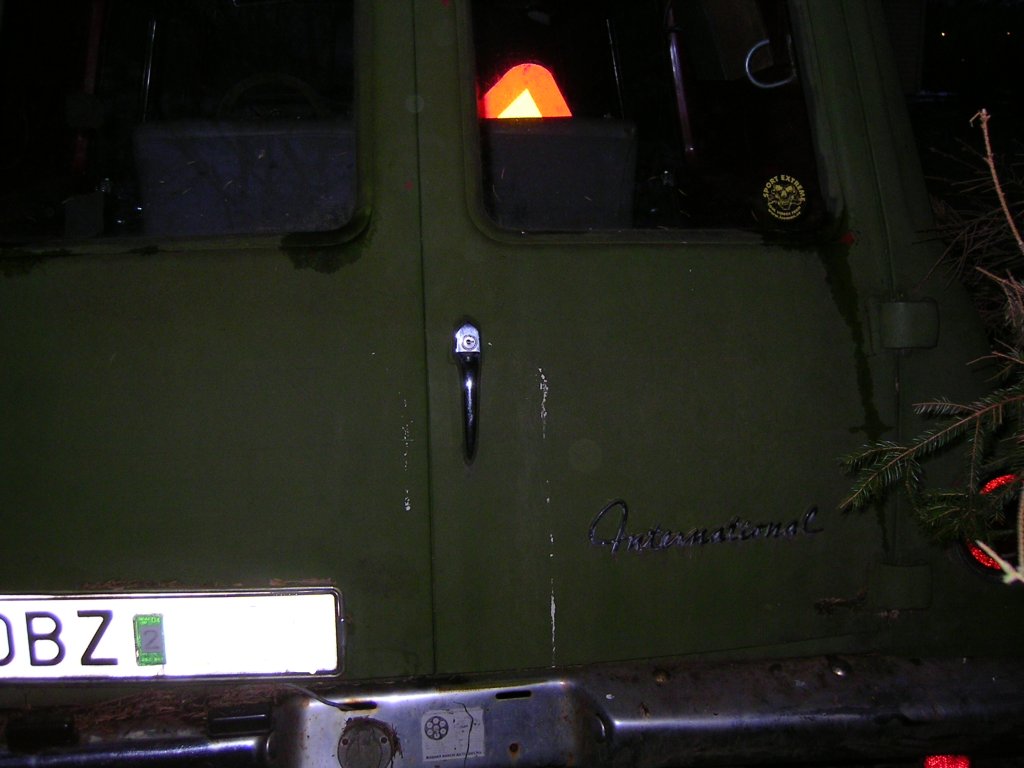
The barn
doors are in pretty good shape, and what you can't see in these
pictures is the hitch.
Pretty stout thing with a 60mm ball. Will
change the ball to a three way with 50mm, 60mm, and
tow hook.
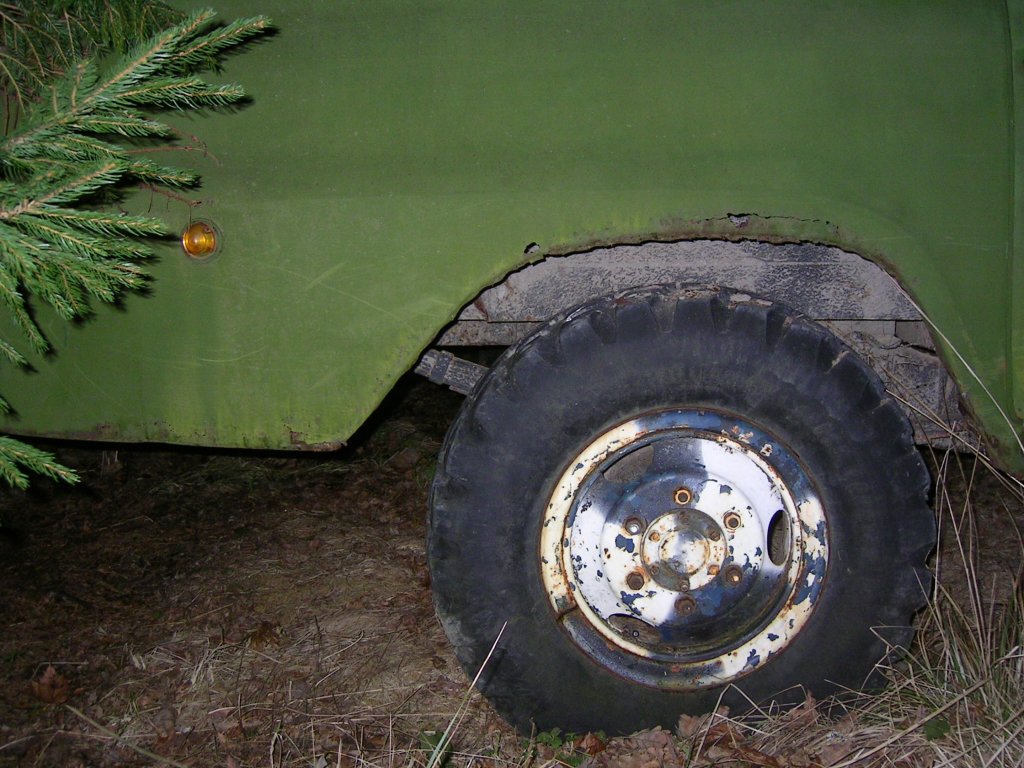
Right side wheel well is
rusty, but that's not really a problem. Easy to fix with the MIG and
some
sheet metal. Right side doors are dented really bad, but
fixable. The rocker have to go on both
sides though. Good thing
they're pretty easy to fab.
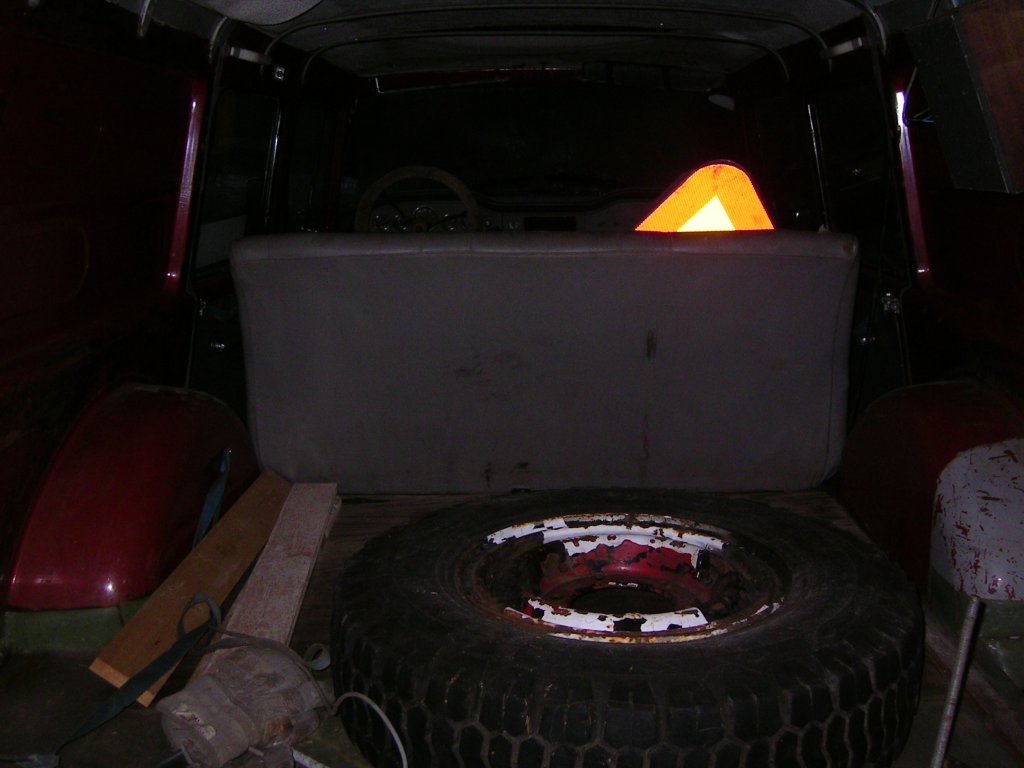
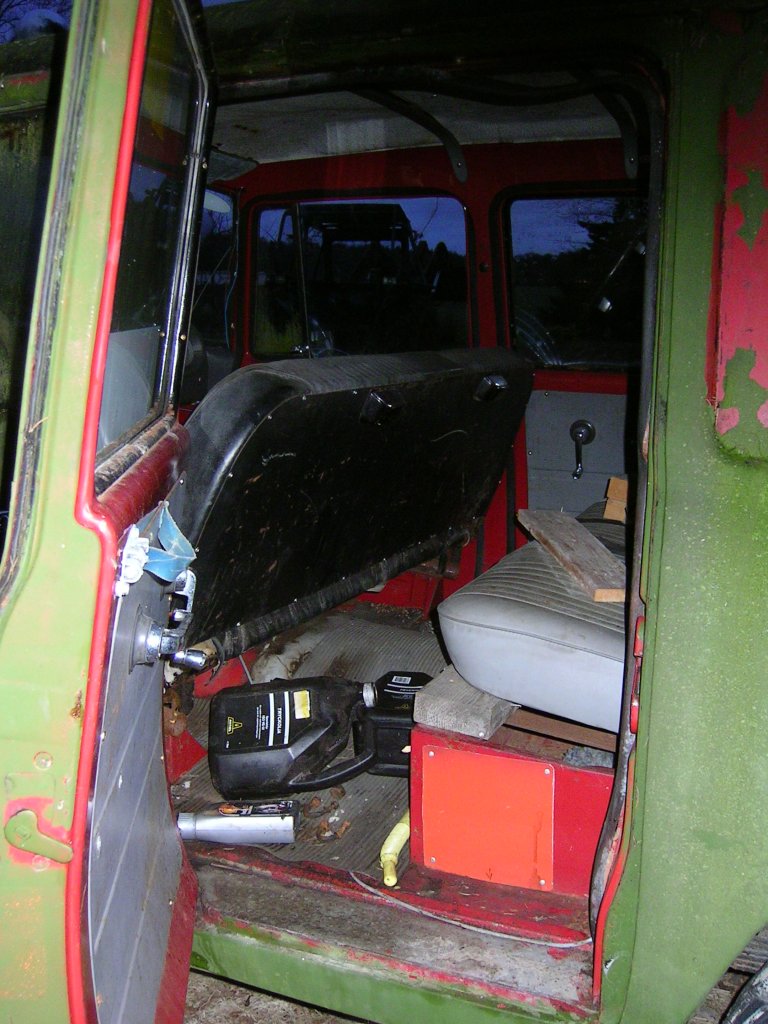
View of inside from the rear. Lots of
junk there too... But, alas, there's a spare tire! The booty fab
wiring in the dash is also something that has to get taken care
of. Otherwise the dash looks OK.
2007-04-17
Got
her home at last! It was kind of an adventure, just like when I got
the ambulance home. This
time we had a better trailer but that
didn't help out much... We couldn't go any faster than 30 mph
or
the trailer would start swaying like a tap dancer on an oil slick.
The result was that we had to take back roads, which resulted in
almost double the distance, and
a 6 hour trip back home. Man was
I wasted at three in the morning...


Right
and left, before loading. She really is a battered bitch!

Loaded
on trailer and ready to go. Well, almost....
2007-04-22
Gave
her a rundown with the pressure washer today, and a lot of the green
color came off, and so
did all the things that grew on her too...
As my sister expressed it, ”There's a whole lot of interesting
things growing on that truck...”
Also started out with
cleaning out all the junk that previous owners left there. Empty
bottles of engine
oil, brake fluid, transmission oil, and
hydraulic fluid. Still a lot left in the back, but that's for another
day.
Oh yeah. I also found a ”bumpy road” road sign back there... What the heck should I do with that?


Left
and front pictures, after washing...
2005-05-05
Started
today to make way for a new steering gear. That is, I removed the
left front fender and started
thinking of a suitable donor for a
power steering gear. Depending on how I mount it I can either use
a
standard rotation like the Volvo 160 series that I have on the
shelf, or a reverse rotation like one from
a Chevy van. The
latter is more appealing as it is a cleaner looking solution, but
I'll have to buy that one.
Still an open question...
Right now
the steering looks like this:
Full hydro powersteering, probably from some
kind of fork lift....
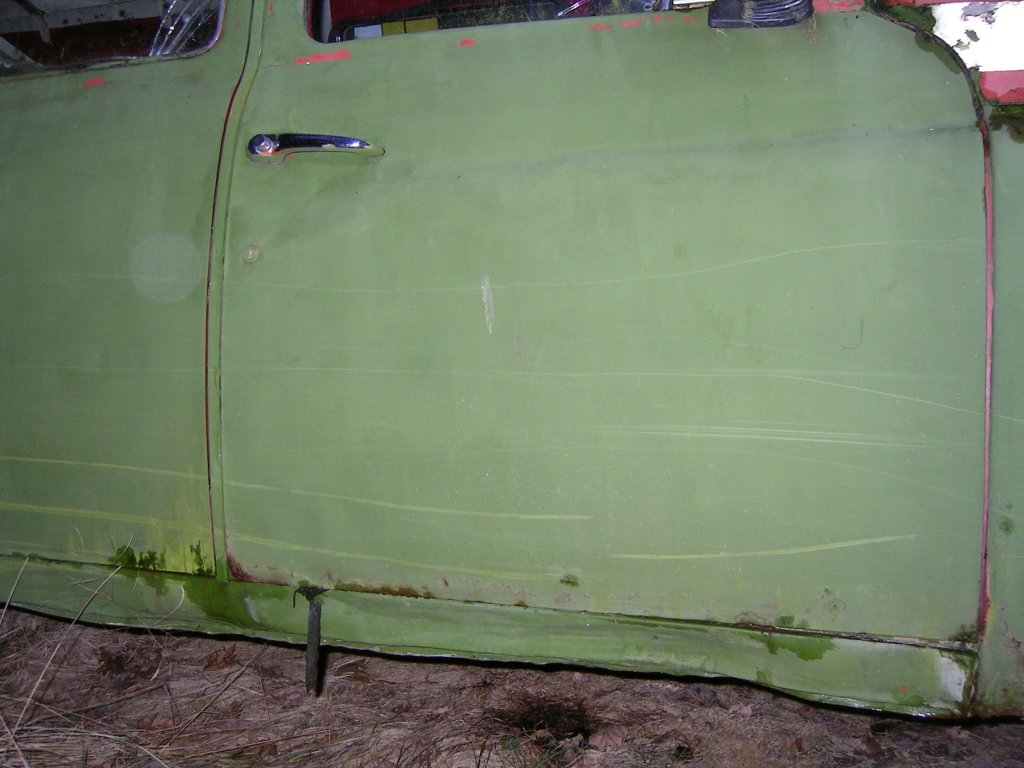
2007-05-08
Started
to fix the spare left front fender. Lower rear part was rusted
through and so was the brace in
the back of it . I cut out the
bad stuff, fabbed up a new piece, and welded it in place.
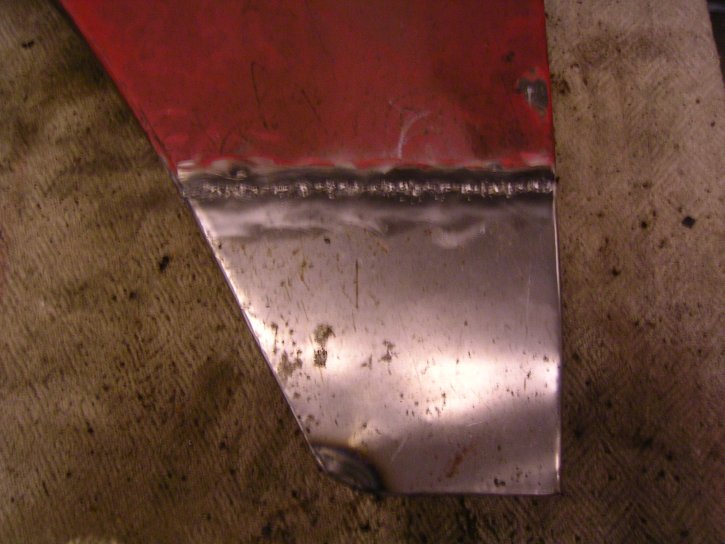
Left
fender, before fixing, and after fixing.
2007-05-10
Did
some more fender work, like grinding all other rust spots, welded new
sheet metal where needed
and applied some body lead. That fender
is starting to look real nice!
2007-11-03
Started
to gather parts by dismantling my chebby van! So, now I got an
engine, a transmission, power
steering, steering column,
hydraboost with master cylinder and warning valve, and a 33 gallon
fuel tank.
The real work starts as soon as I get the chebby out of
the garage and get this battered bitch in.
I'm thinking
along the lines of putting the engine from the chebby van into my
ambulance, as it is a couple
of years newer and a lot quieter
than the '87 I got there right now, and take that older and more
noisy engine
and put it into the battered bitch. I'll likely drive
more with the ambulance, so the better engine should go there.
Anyhow, looking
at the chebby steering gear, it looks like it will be a perfect fit.
I'll have to fab a bracket
for it and switch the pitman arm, but
that's about it. No sweat.
This time I will do the steering gear
and hydraboost before dropping in the engine/tranny combo.
2007-12-01
Time
for another update. I've been quite busy with my new job so I haven't
done very much on the Battered Bitch.
But today I finally got out
to the garage and started on the steering. I had a couple of hours
work with getting the
pitman arm off of the chebby steering box,
but at last it came off with a bang... Some pics here....
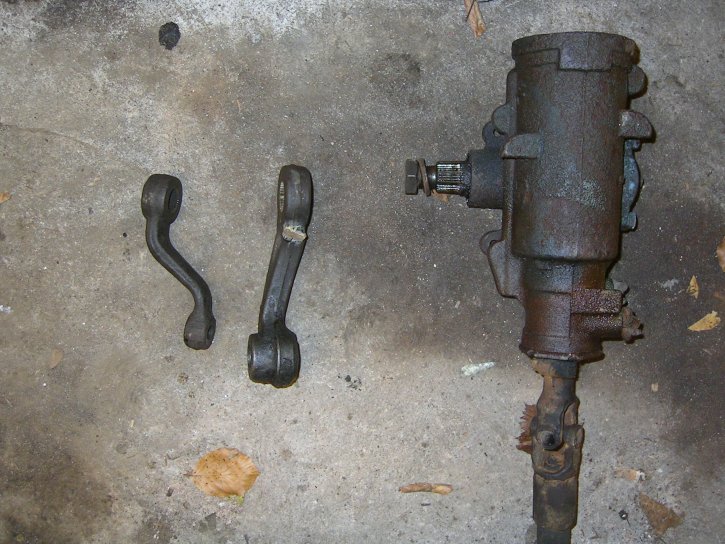
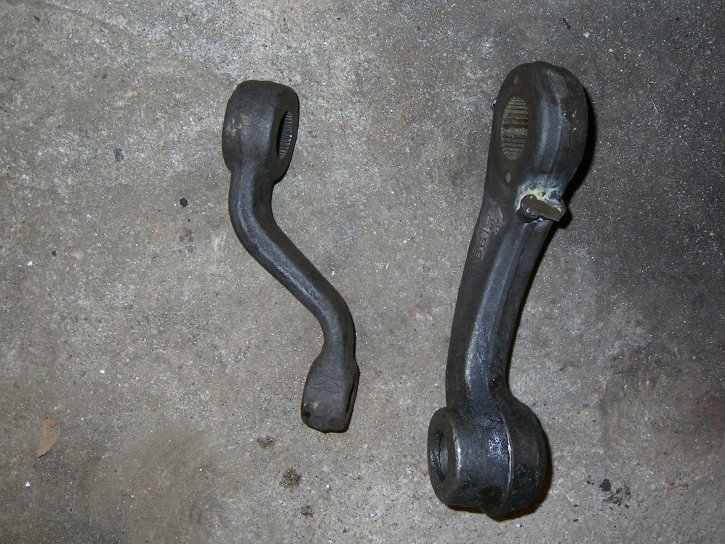
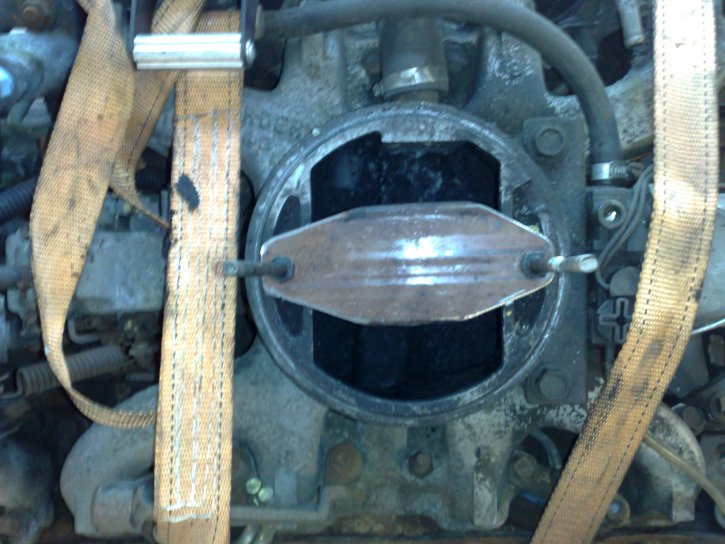
IH
pitman arm, GM pitman arm, GM steeringbox, and the hydraboost.
The steering
box is pictured the way I intend to mount it, on top of the frame
rail with a home made bracket. I'll
do proper reinforcements and
I'll probably box the frame at the mounts too. Pitman arms are
discussed below,
together with more pictures. The Hydraboost is
standard chebby van issue, nothing special about it.
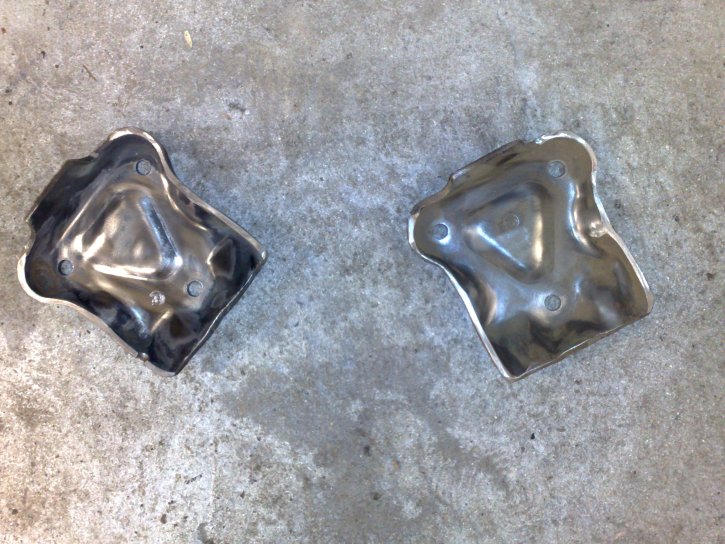
In the pictures below we take a closer look at the pitman arms and I'll try to explain what I intend to do and why.
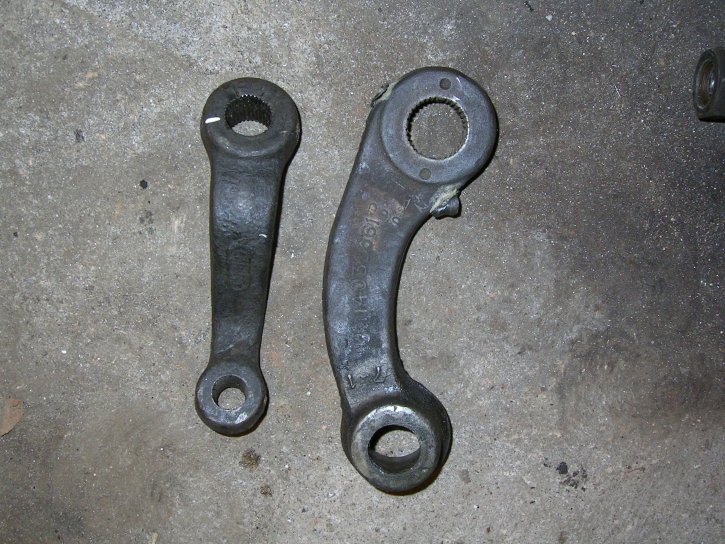
Different
views of the IH (left in both pics) and GM pitman arm.
What I'll use
is a combination of both arms. As you see the IH arm is curved a lot
more than the GM arm, and
that is due to the mounting of the IH
steering box on the outside of the frame rail. The curve prevents the
spring
from hitting the pitman arm when it flexes. As I'm
mounting the GM steering box on top of the frame rail I will need
a
slightly longer arm to avoid ”bump steer”, and it doesn't
need the curve in it as the sector axle is much closer to
the
frame. The GM arm fits both these criteria, and further more the IH
arm does not fit on the GM steering box.
On the other hand, the
tie rod will not fit on the GM arm... Soooo, out comes the angle
grinder and the welder!
I'm not going
to just cut the two arms and weld them together. It's not safe to do
that, and when it comes to steering
and brakes I'm quite anal
about safety. Those two things are the most important ones on ant
vehicle.
What I'm going to do is as follows. If you look at the GM
pitman arm you see the end of it is a lot larger than the
IH one.
The hole in the GM arm is also really large, and if I cut the end off
of the IH arm and grind it to size, it will
fit into the hole in
the GM arm. The GM arm is uncompromised what regards strength, and
the end of the IH arm
will be fixated into the GM arm with a
couple of spot welds. I'll post pictures of this when I done the
deed.
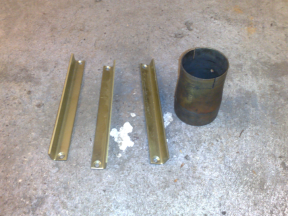
2007-12-22.
Just
a small update. Fabbed up a bracket for the chevy steering gear and
tacked it in place. Still need to drill
all four holes for the
bolts, and still need to weld it to the frame. I'll only weld the
edges that are parallel to the frame
as I don't want to introduce
any places for the frame to develop cracks. Pics of the bracket
below...
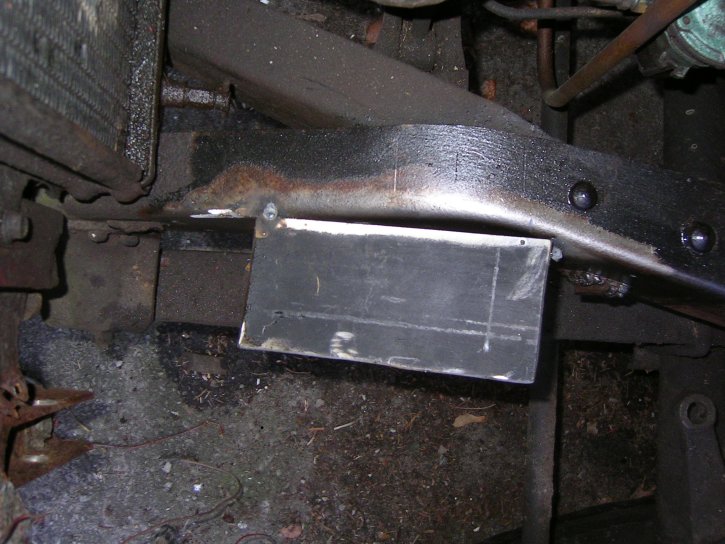

New
steering gear mount bracket.
2008-01-13.
Another
update! A couple of days ago I got the steering gear bolted in place.
No big problem but
drilling the holes for the bolts was a pain in
the rear. I've got to get a good drill press.
I also finished the
link between the pitman arm and the knuckle, and thus the pitman arm
too. The
link consists of an inner tie rod and adjuster from a G20
van, and the short end from the IH link.
It fits like a hand in a
glove...
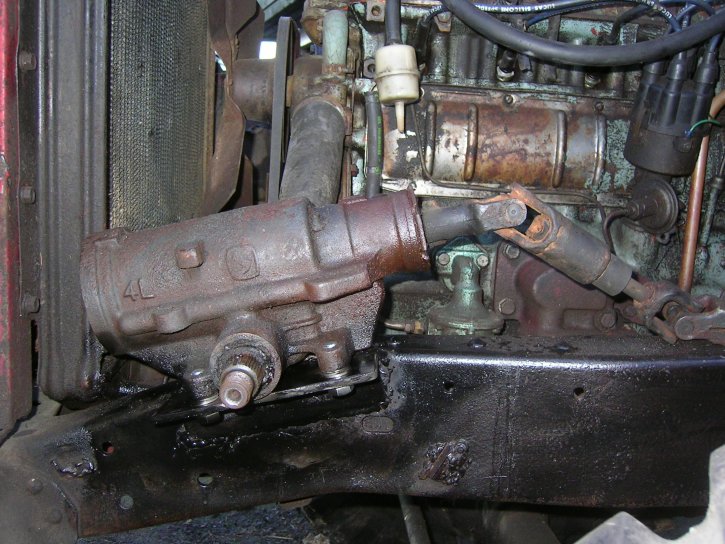
Steering
gear in place, and steering link and pitman arm too...
I had to modify the pitman arm from
the Chevy. I did it as described above but used a taper from
the
drag link from the G20 van. That way I saved the IH pitman arm for
the future. Pitman looks
like this when modded....


Modified
pitman arm. Preparing to install steering column.
I just rounded off the taper to a
size that fit into the GM pitman arm, and welded it round the
edges.
No big deal, and the strength of the pitman is not
compromised in any way at all. I also had to file
off the keys in
the splines of the pitman arm to be able to locate the arm in what I
found to be the
correct position.
I also, as you can see in
the second picture above, started to prepare for the steering column.
The
clutch peddle is gone and I made the slot for the column a bit
wider. It seems like I will have to
relocate the brake peddle a
little to the right, half an inch or so, to get enough room for the
column.
The ignition switch on the column is waaay too close to
the brake to get the wires connected to it.
2008-01-30
Finally
I got my Line Setting Ticket for this old battered bitch. That got a
few things confirmed, and
a hick-up or two also. But that's
pretty common stuff when dealing with IH stuff. Turned out the
rear
axle isn't what I thought, a Dana 60, but a corporate IH
axle. Not that it matters much, I'll probably
change it out
anyway...
Anyhow, here's the LST...
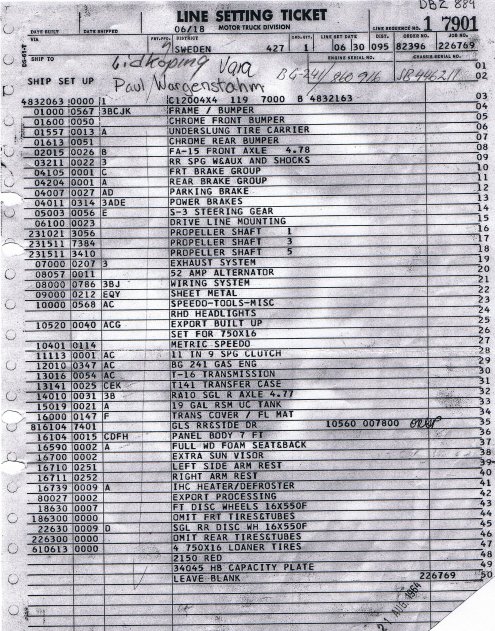
Note
the last item, the capacity plate, is delivered blank. So, someone
here in Sweden stamped
what ever capacity they found appropriate
on them. Interesting.
February will be a busy month with no
shop time at all. Lots of birthdays to attend and a couple of
other
celebrations too... Not much to do about it but to grind my teeth and
try to smile...
2008-03-01
This weekend I finally got something
more done on this Battered Bitch... I started to fit the
steering
column, and with a little help of the angle grinder and
the little welder I got it in place. It's adjusted
but not bolted
in permanently. I do need a better welder! This little gasless 110A
welder just doesn't
cut it, and the welds just don't look good
enough for me.
I also started
on figuring how to mount the hydraboost, and came to the conclusion
that I have to
fab an adapter between the twin master cylinder
mounting bracket and the hydraboost bracket.
I think I have it
figured out, but we have to see... Pics will follow....
2008-03-08
Yesterday I got myself a new welder.
Well, not a new one, a second or third hand one. It was
practically
given away so I just couldn't resist it as it was of my favorite
brand ESAB. It's a 200A
three phase machine, model Power Compact
200. Pics below.


The
new welder. Weight about 170 pounds and I loaded/unloaded it by my
self. Ouch!!
I've also
cleaned up a bit in the garage and built a new work bench today,
including a new vise.
This is a thing I've wanted to do for a long
time as I have felt the need for a place to do slightly
heavier
stuff than fixi'n up a fender or two... Now, if I only could figure
out how to double the floor
space everything would be
honky-dory...

My new workbench. Had to keep it small, just 2' by 6'. Bolted to
wall and floor.
Another thing that seems flip back
and forth is what rear axle she's got. I got some scans from the
MT-110 Master Parts Catalog of the RA-10 and it is definitely NOT
a RA-10 on the truck. So, I
guess I have to get under there with
the wirebrush and try finding some info...
2008-03-22.
Finished
up the steering today... This should have been done a long time ago
but with all those
birthdays and other happenings there just
hasn't been any time... Anyhow, I finally got it together.
Fabbing
up a bracket to mount the steering column under the dash was pretty
easy as I had the
bracket from the chebby van to modify. It was
just too deep, so reducing the height by 3/4” was
all that
was needed. Angle grinder and welder were the tools of choice for
this...
I also did the steering shaft. I used the one from
the van and just made it 8½ inches longer using
common ½
inch water pipe. I just love that new welder!

While I was on a winning streak I started out on the converting
bracket for the hydraboost. The
booster side is good to go and I
figured out how to do the firewall side with the materials I have
at
hand. This really is a budget build, and I won't buy anything I don't
really, really need...

Some
junk I had in a box... Second pic is the finished bracket for the
hydraboost.
Fabbing up the bracket
was a piece of cake with the new welder and the new hole saw kit I
bought the other day. Take a look at my “Tools 'n Toys”
page for more info. Some black
Hammerite makes it look all shiny
and nice....
Now I have to fit the
hydraboost to the old girl and see how I get the push rod to fit the
brake
pedal. I guess I have to make it a bit longer, but that's
not really a problem. I'll even make it
adjustable by cutting it,
threading it, and put an adjuster nut in between.
That's gonna
happen this upcoming weekend.
Another thing I got to
do before things get too tight down there under the dash, is to get
wires connected to the ignition switch. I don't know if I will
get to it when the column is set
and the hydraboost push rod is
connected.
This means I also have to rip out some electrical
stuff from the old donor chevy van. Seems
like I have a tight
schedule this weekend!
2008-03-30.
This
weekend was good! I got everything done that I had set out to do, and
would have gotten
more done if I hadn't had to redo the
hydraboost bracket. It turned out that I got the wrong angle
between
the plates, so I had to cut it up and reweld it at the right angle.
Lesson learned, don't
paint things before you check they're good
to go.
The push rod for the
hydraboost is now 4 inches longer and adjustable. I used the adjuster
part of the push rod for the clutch cylinder as it had the same
diameter as the hydraboost
push rod, and welded them together.

I
also put pigtail wires on the ignition switch. To do that I had to
drop the steering column and
modify the brake peddle a little to
move it as far right as possible. There's still a little rubbing
between the brake peddle and the wires, but I'll take care of
that by clamping the wires tighter
to the column with a small
aluminium bracket.
Anyhow, now the steering column is bolted in
place for good. Or at least I hope so....
I
also ripped off the searchlight. I won't be able to get her indoors
with that on as my garage
doors only are 6'8” high. It will
be tight enough anyway, and I hope I don't have to air down
the
tires to get her in.
2008-04-05.
Not
much done this weekend... I just got a few hours of quality time with
my IHs, but I think
I made the best out of them. So, I got the
little aluminium plate that protects the wires from
the ignition
switch done. A pretty simple job but it took some time as it's tight
down there under
the dash. Still have to figure a way to fit the
brake return spring that came off during the steering
column
installation... Hope I don't have to drop the column again, I'd hate
to do that!
I
also cleaned up a little in the wiring under the dash. With cleaning
up I mean that I ripped out
a shopping bag full of wires that
previous owners have installed for God knows what purposes.
I also
took out the instrument cluster, mostly to get access to the steering
column to attach the
wire protector plate, but also to be able to
replace the instruments with those from my other
IH, the old
ambulance, when I upgrade that one to Dakota Digital.
Engine
mounts.... Ahhh... Well, I've started to look at them and figure out
how I'll do them. The
most likely solution is to copy Advance
Adapters design for chevy engine into Scout mounts.
But as always
I'll do it my own way with the tools and stuff I have available...
Pictures later....
2008-04-19.
Today
I finally got around to rip off the front clip.
This was easier said than done... Most of the
bolts and
nuts were either rounded or rusted, but hey, I have a new front and
and new front
fenders, and the old ones were too rusted or hacked
up anyway. I just ripped them off.
The front guard that some
previous owner put on is a story of it self. It was made of
U-channel
and weighed at least a 100 pounds! Further more, it was
welded to the frame in six places
as well as bolted through the
frame! It did clear my toes with a couple of inches when it went to
the ground after cutting the last weld....


Grill
guard and front clip off. The cut in the rad is for a water pump
drive.
I
also ripped off the rear brake drums and brake shields. I know these
are very, very hard to
find in good condition, and at least one
of mine is in pristine condition! The reason to rip them
off is
that Martin, a bud of mine, needs new drums for his Travelette and as
I'm going for new
axles anyway I thought he can have them. I'll
get some cool stuff I need from him in return.


Rear
brakes assembly... Good solid drums.
Now I need to get the truck into the garage to get the engine and tranny out...
2008-05-01.
May
1. The day all workers unite and work a day without pay for comrade
Stalin. Not me
though, I spent a couple of hours in the garage
trying to get something done. The weather
has been awful, cold
and rainy, so I had to stay inside and just do minor things, that
is
cleaning up and starting out on the engine mounts.
For now
I just have cut the OEM GM diesel engine mounts to shape, and made
them ready
to weld the U-channel on to them. Looks like this:
GM
engine mounts cut to shape.
The
U-channel will be welded on the mount brackets in a way that make
them stick out
horizontally from the engine. The U-channel will
be bolted through a rubber cushion to a
bracket welded to the
frame. More pictures will follow...
2008-05-04.
This
weekend was kinda good. Got the whole Sunday spending some quality
time with my IHs
and did get something done! Weather was perfect,
sunny and warm no rain in sight what so ever.
Feeling a little
like a redneck I started out at noon to get the engine out of the
Battered Bitch.
Pictures of that shade tree enterprise follow
here...

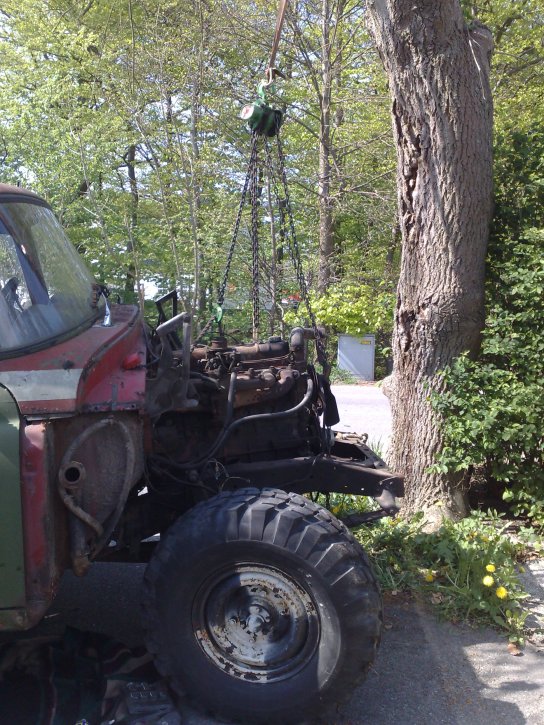
All
you need is a shade tree, some rope, and some lifting gear! It
works!!
It
wasn't that much work doing it this way, and besides, I didn't have
room enough in the garage
to do it inside. Why should I, as the
weather was beautiful...
The most aggravating thing was to get to
the upper rear bolts of the cross member. There's still a
5/8
wrench stuck between the frame and the body, but I'll take care of
that later... Otherwise
everything went pretty smooth...
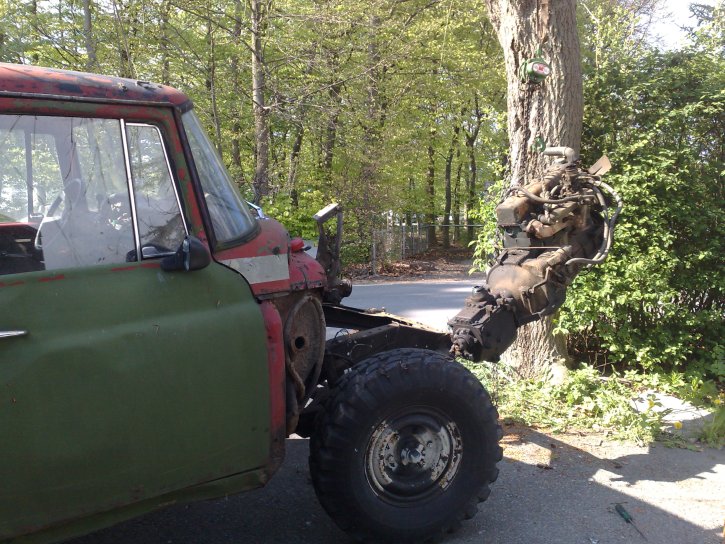
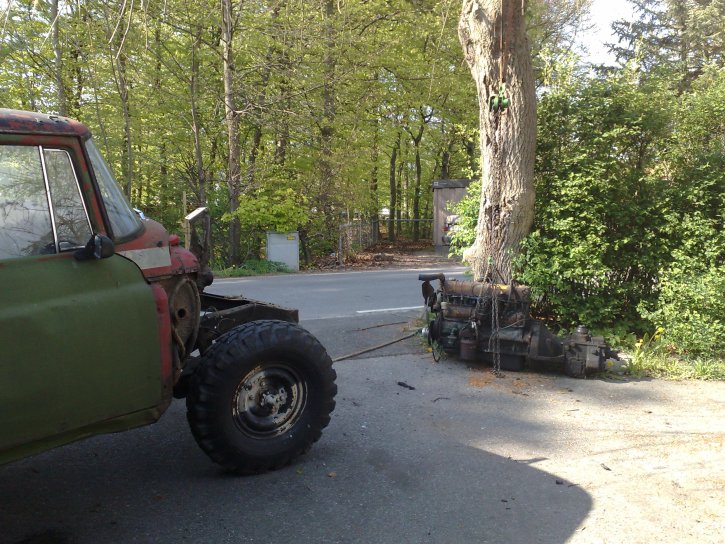
Engine
out. Ever seen an airborne BG-241? Well, it settled safely on the
ground in pic 2.
So,
next time I get to have quality time with this ol' girl I'll take out
the pressure washer and get all
the dirt off the frame and throw
on some primer and paint. For now it looks like this:
Grimy,
dirty engine bay. Will get cleaned up as soon as possible...
I
also started to take some measurements for the 6.2 and TH700R4 that
will occupy the engine
bay. The BG-241 and T-98 combo is about
1620 mm, and the 6.2 and TH700R4 is about 1550.
Distance from
center of tranny yoke to center of engine mounts is about 1200 mm,
and that will
place the engine mounts right behind the front axle.
Seems like a perfect fit! I love it!!
2008-05-09.
This
has been a good Friday! Actually we were going to Germany over the
day but the trip got
cancelled due to the other half having a bad
stomach ache. Really bad...
So,
what did I get done today then? Well, I got a lot done. Lots of small
things that were in the
pipeline to do as soon as possible but
never really got the attention to get done.
First off I pressure
washed the front of the frame with everything connected to it, like
axles and
stuff like that. I got most of the grease and grime off,
but there's still some left so I have to go get
some de-greaser.
Anyhow, now you can touch it without getting dirty all over...
I
also went along with the engine mounts. Angle grinder and welder are
the tools of choice for
this kind of work, and I think I made a
pretty good job with them.
I had already cut down the GM engine
mounts to a usable shape, like you could see in a previous
picture.
Now I cut one side off of a 2½” square pipe to make a
U-channel, cut it to the right angle
and welded it to the engine
mount plates. Most of the time it took was spent on making sure it
was level, and that it would fit right.
From
this pile of junk to... An engine mount....
The
U-channel is made a bit too tall on purpose and will be cut to fit
when I'm mocking up the part
that will be welded to the frame. I
also made that part, and while I was at it I cut out an EGR block
off
plate. I don't need any emissions stuff at all on a truck this old,
so EGR and EPR will come out.
Frame
side engine mounts, and the EGR block off plate.
2008-06-01.
This
Sunday was kinda great! Got quite a few things done, like getting the
Bitch indoors. That took
just over one and a half hour with all
the wiggling needed due to a lot of traffic on the road outside
the
garage... Anyhow, inside she went and I started to mock up the front
engine mounts.
The
engine mounts are made of 2½ inch square pipe, cut to shape
with the fantastic angle grinder.
The rubber part is a reinforced
Volvo 160-series engine mount. Fits quite nicely.


Engine
in place and engine mount.
Getting
the engine and tranny in and line it up to the transfer case wasn't a
big deal. It really just
fell into place and with a few small
adjustments I got it right. Without the inner fenders the engine
bay
looks kinda deserted... That 6.2 liter diesel isn't as big as
it seemed while standing on the floor.
The
rear tranny mount crossmember will be more of a challenge as it has
to bend upwards pretty
sharp to avoid hitting the front drive
shaft.
Talking about drive shafts... The intermediate drive shaft,
the one between the tranny and the transfer
case, will be short.
Very, very short.

Intermediate
drive shaft.
Is
this the shortest drive shaft ever seen? Well, it might very well
be... It measures 70mm (just a little
less than 2 ¾
inches), yoke
center to
center!! It should have been even shorter by a couple of mills...
2008-07-01.
Transmission
crossmember done and some new holes drilled in the frame rails for
it. The thing looks
kind of ugly but it does the trick.
![]()
Now
that I've come this far it's time to drag this one out on the yard
again and let it rest for a while. So,
out she went and in came
the old ambulance. The ambulance needs a heart transplant, that is a
newer
engine and transmission, and as she is my daily driver she
takes precedence... Read more about this
in the '67 Travelall
page...
2008-12-16.
A
couple of weeks ago I talked to a guy that had all six doors for a
C-series Travelall that he was willing
to part with. After some
negotiations, that is sitting on my behind until my offer was
accepted, I went and
picked them up today. The doors are in very
good condition, maybe except the drivers door which is a
little
rusty in the lower area. Anyhow, they're the right color, red, and
the glass is good too.
This guy has a hood too, but that one is
already spoken for. Assuming the guy who wants it doesn't show
up,
I might get the hood too...
<placeholder for pictures>
I
will use these after stitching up the drivers door, and save the not
so good ones to use if something
bad happens in the future.
2009-01-05.
Finally
I got some time for this poor battered bitch... There has been a lot
of repairs on the ambulance
and it simply hasn't been any free
time before this new year. So, she got inside today and I got busy
with
all the dents in the rear quarter panels. Right side was
really ugly, and I had to bring out the heavy artillery,
i.e. the
body jack. When I finished for the day the rear quarter was ready for
lead and body filler, which
means dents are no more than a couple of
millimeters. Bottom of right rear quarter still needs some rust
repair though.


Right
rear quarter before dent removal, and after.
I also started out on the
left rear quarter. This one is severely dented underneath from when
the previous
owner had the rear axle come off while driving... It
also needs rust repair, so I just pulled the largest dents
and
will do the finishing when that happens. Hopefully pretty soon...

Left
rear quarter patch panel.
I also dropped the fuel tank
and cut it open to put in a slosh guard for the fuel pick up and fuel
level sender.
This tank will end up in the ambulance due to the
sensitivity of the cool, new digital gauges. The tank that
comes
out of the ambulance will end up here, in the battered bitch.
Pictures of tank and slosh guard are
shown in the '67 Travelall
page.
2009-01-19.
Finished
the rust repairs on the left rear quarter, and the back part of the
inner left rocker and C-pillar. Next
will be fixing the rust in
the right rear quarter, wheel well, and inner rocker / C-pillar. I
kind of decided to do
the bodywork in sections, from the back and
forward. This is mostly because I need some structure and I
also
need a plan to follow, or nothing will happen.
With some luck I
will get a few hours the next couple of days to finish the right
rear...
2009-01-23.
The
last few days we've been busy packing up all the Xmas stuff and put
it in the attic, but I managed to
sneak away for a couple of
hours yesterday and today. That made it possible for me to start rust
repairs on
the right rear quarter and wheel well. To make it a
short story, I've done the outer sheet metal patches both
on the
lower rear quarter (like in the pic for the left side above), and the
outer wheel well.
The quarter patch I made up from scratch with
some sheet metal. For the outer wheel well I used the
corresponding
pieces from an old front fender... It's almost the same curve and I
only had to hack into it at
one location in the middle, and of
course fix up the ends to fit the rear panel.
Still need to do all
the inner patches, but with some luck I can sneak off a while on
Sunday too...


Right
rear quarter patch and right wheel well after patching.
I haven't been able to get
at the rusty places behind the rear bumper yet, due to my compressor
being at my
other house (and current residence), and I need the
air tools to get that bumper off. Bad thing to need the
same
things at two different places... Guess I have to buy a small
compressor for those household jobs...
2009-01-26.
Never
got the time to get out to the garage this Sunday, but it's only
Monday today and I got a few hours of
rust repairs done today...
This means that the inner wheel wells are done, and so are the rear
inner rocker
and C-pillar on the right side too.
Still have
the small holes behind the bumper to do, and the hole for the side
marker light will be welded up too.
Then there are a few burn
through holes to fix too, but that's minor work.
Next in line are
the rockers... Not because of rust, more because they are so severely
dented they're impossible
to straighten out. But that's for
another day....
2009-01-29.
Got
a couple of hours of good work on the IH today and finished up those
little things I forgot on the inner
wheel well on the right side,
and found two more holes to patch there. Done those too. I also
managed to
weld shut the side marker light hole and the three
small burn throughs on the outer wheel well.
Not much, but alas,
always something... Will try to get a couple of hours tomorrow
too....
2009-01-30.
I
felt lucky today so I decided to go out to the garage and do a couple
of hours of hard time... At least it felt
like a hard time when I
realized how much work the right rocker needs to get done. It was so
badly dented
that the inner rocker was warped too and I had to
bring out the body jack to straighten it out first. I pushed
the
inner rocker in place and then I cut the outer rocker panel off,
about ½ an inch below the door.
With the outer panel off I
could use a hammer and dolly to straighten the lip for the panel, and
that's about
as far as I got today.
I also discovered that the
passenger side body mount is rusted badly and needs attention. I'll
take care of
that before the outer rocker. At least I think
that's a good idea, but we'll see...
2009-02-02.
Today
I took care of the passenger side front most body mount. This
included a portion of the passenger
side floor too, and it took
me a couple of hours to do. The A-post was somewhat dented and rusted
in a
couple of places so I took care of that also. Pics, pics,
pics....


Body
mount before fixing and passenger floor above bodymount after fixing.
2009-02-06.
Axles, axles, axles!! Don't ya just love it when stuff you need just drops onto your lap? Not litterally on
these though, it would've hurt a lot, but y'all get the drift... Well, anyhow I got some nice newly painted
Chebby axles, rear 14 bolt with a locker of some kind in it, front D44, no locker, both with a 4.10 ratio.
Perfect! As they have the 8 bolt wheel pattern I also got four rims with not too bad tires. These were
included after me bitching a bit over the missing diff cover on the rear axle...
So, now there's another thing I can strike off the to-do list, and maybe I can git 'er done!


Front Dana 44 axle and rear GM 14 bolt.
2009-02-08.
Today I just took some measurements to see how these axles will fit, and found out that the front D44 will
bolt right in, and that I will have to move the spring perches closer together, about 4 " total on the
rear 14 bolt axle. No big deal, cause I probably will have to adjust the pinion angle of the axle anyway.
Axle width is just perfect at 1700 millimeters between wheel mount surfaces. Only cloud in the sky is that
I'll have to get a diff cover and a drive shaft flange for it. Always some crap happening...
I'd love to get to the axle work at once, but I still have to finish the rockers first...
2009-02-09.
Got a few things done today, like the right rocker... I had to fabricate it from scratch but it was no big
problem as it is just straight sheet metal, with two bends. So, it's in place, but only tack welded so far.
I also checked on availability of the diff cover and other stuff I need for the rear axle, and I've pretty
much found everything I need. Pictures of the right rocker will follow when it's done.
2009-02-11.
Finally got to do those small rusted areas behind the rear bumper. So, a while ago I got the compressor out
to the garage again and thus I can use my air tools there. Hallelujah! Nothing big done today, just two
small patches, but a picture or two are never wrong...


Rear corners, left and right, usually hidden behind bumper.
I also picked up my diff cover for the 14 bolt rear axle, and found out that there's no filler hole in it.
Gotta fix that somehow, how else would I be able to fill it up? While picking up the cover I ordered some
missing brake parts also, gonna pick them up next week.
2009-02-13.
Got a few moments today to do some rust work again, and got the left rocker off. No surprises there, but I
got one when looking closer at the left front bodymount... The floor in the cab was almost gone over the
bodymount, just a thin layer of scale rust left. Also the gusset between the bodymount and floor was rusted
from the inside so that had to go too. Well, it never gets boring working on old IH iron... Oh, I almost
forgot what day it is today, Friday the 13th, so it might not be a big surprise that things can go wrong...
Picture below, in which you also can se some previous owners attempt to fix the body mount with bondo...


Driver side floor at body mount before fixing, and after.
2009-02-16.
Today I did the driver side bodymount and floor. I also fabbed up the left rocker but didn't get the time to tack
it up in place. It's a lot more work than you think to cut sheet metal to size and patch holes like this, but
what the heck, it's only time... See right pic above to see the result.
2009-02-18.
Rockers done! Made some good time today and finished off the rockers, both left and right, and also managed to
do the small rust areas in the A-pillar. I must have worked pretty fast as I only had three hours to do all this stuff.


Left and right rockers welded in place.
I also found the time to go pick up some stuff for the rear axle, like the drive flange and a complete set
of brakes including the hardware kits. So, now I'm good to go with the axles, except that I found out I need
another U-bolt for the front axle. The IH front D44 has one U-bolt on the right side, the Chevy one has two.
And, I found out why there's no fill hole in the diff cover... The oil fill is in the axle housing, at a pretty
obscure place, and that's why I didn't see it at first. Mea culpa.
2009-02-20.
Got a few things done today, praise the Lord. Or whom ever. First off today was to get the missing U-bolt measured
up and get it on order. I also found out that I've got the wrong wheel cylinders, so I arranged to have them
swapped out for the real ones. No problems there, will be ready next week. This means that next week will be
designated as "axle week", or at least the latter part of it.
The angle grinder had a tough day today as I ground down all the welding I've done so far. The cheap one I bought
a year ago is toast, I'll try changing the brushes, but if that's not it I'll toss it and get another one. The old
grinder still works after five years of abuse, so I guess you get what you pay for...
I also started on the cowl rust that always is present on an IH, and of course it was more than I first thought it
would be, but that's life. I did as I did on the old ambulance, cut the outer cowl open and fixed it from there.
After stiching it up I applied generously of zink weld through primer and I will spray rustprotection goo into
the cowl when I'm finished welding there.
Left side done, right remains, but it's not all that hard to do. Pics tell a lot of what it was like...


Left inner cowl before and after patching up.
2009-02-23.
Did the right front cowl today... It was worse than the left, but not by much. Fixed it the same way I did with
the left one, cut it open and patched it up. Still have to weld the outer panel back though, which I thought I
would have had time to do today but hadn't. Tempus fugit -- Time flies.
I also went out and exchanged the rear wheel cylinders for the right ones, and found out that the U-bolts haven't
arrived yet. Will be here next week though... Picture time....


Right inner cowl before and after patching up.
2009-02-25.
Welded the outer cowl shut today... More work that I anticipated, but that's how it always is. So, now there's
some more grinding to do, and then smoothing things out with body lead. I'll only use body lead in locations like
this on this build. Rockers, rear quarters, and such will be smoothed with fiberglass and bondo.
I also got a notification that the U-bolts will be ready tomorrow, so I'll pick them up Friday.


Left and right outer panel patched up.
2009-02-27.
Today I decided to let go of the rust works for a while... I was getting tired of stumbling over the new axles
lying on the floor and thought I'd do something about it. I started on the rear axle, grinding off the spring
perches and the fasteners for the shocks. It was more work than i thought, but the old angle grinder and a BFH
did the trick. I checked the angles of the drive line and did a small adjustment as they were not equal but
oppsite, and moved the perches a little less than 1.6 inches inwards on each side. Welded them in place with out
any problems, gotta love the "new" welder...
Removing the old badass heavy Dana rear axle wasn't anything I recommend anyone to do on their own... No
problem
dropping it, but dragging it outside was a bear! Getting the new 14 bolt axle up wasn't that hard, but a
pair of
extra hands would have helped a lot. But me, the shop jack, and some air tools had it up in no time at all.
Oh, by the way, my U-bolts haven't shown up... The Swedish postal service probably screwed up again...


Freshly welded spring perches and the old axle dragged outside.
2009-03-02.
Spent some time today doing what hadn't intended to do... I was going to fix the rear brakes, but found out I
still miss some parts. Namely the lever for the parking brake. U-bolts haven't shown up either so no dice doing
the front axle either. Ordered the missing stuff and bitched about the U-bolts...
I did manage to do something though... I missed to weld the shock absorber plates to the axle, and found out I
had to modify them quite a bit to make them fit the IH shocks. So, that's what I did today, not very much but
essential stuff. Pictures later...


Rear axle in place, shock mounts welded, and a close-up of the shock mounts.
2009-03-03.
Yay! Got my U-bolts and wheel nuts today! But no parking brake lever... Anyhow, I had to get those rear drums and
some wheels on so I could lower the old bitch to the ground. I really like the height of the rear with LT265/75-16
tires, and I hope the front comes out equally good. I managed to rip out the old D44 front axle and get the newer
D44 in place. Old left U-bolts were a little short, so I'll have to think of something else there. I think I've
got an idea about how to solve it without getting new U-bolts for that side too... Looks good so far.
Now a few pictures, at least two of the stuff I picked up today...


U-bolts for the right side and new and fresh wheel nuts.
2009-03-06.
Finally got the right side of the front axle down where it belongs. I had trouble with getting the centerbolt of
the spring seated in place. I ended up cleaning it really good, and give it a few rounds with the ol' file. That
did it. Also did the last fabrication on the spring plates, i.e. welded the pieces together.
This axle is wide! I'm kinda thinking it is too wide, but I can't be sure before the fenders are on. That is not a
good thing as my curiosity will make me work faster and harder than I should...
One solution would be to widen the fenders a bit by cutting them open and welding in a piece of sheet metal in the
curve that goes outward, just before the fender edge. Much work, but doable. Another solution is a narrower axle.
Still miss my parking brake lever... Well, anyhow, pics of the right side front axle and a view of the rear stance.


Right front and a rear view...
Also, looking at the steering, it seems like I have to redo that too... This ain't no good as I put a lot of work
into that part and I hate doing things over again. The reason for this is that the GM axle has a much lower
steering arm than the IH axle and I'll be getting a lot of bump steer if I don't do something about it.
Either I have to do some kind of riser between the steering arm and the knuckle, or I'll have to move the steering
gear down to the side of the frame. Moving the steering gear might be the better solution, just have to be
careful not to hit the spring at full flex. I'll look into that tomorrow...
2009-03-07.
Steering sucks. Yeah, really. After removing the bracket I fabbed up for the steering gear to move it, I found out
that it rotates the wrong way. Now I have to find another steering gear too... I need to get this done ASAP.
I got something done right though. I applied the body lead on the welds on the front cowl. Turned out really good
and you can almost not see that it has been welded shut. Pics below....


Left and right front cowl smoothed out with body lead. Looking good!
2009-03-10.
Today I began the hunt for a different steering gear. Went to two different wrecking yards but neither had anything
I could use. This sucks, but I still have a few options. After this depressing task, I went out to the garage and
started to weld shut all the holes in the roof of the poor bitch. There was a lot of them as she's an old rescue
vehicle, and it took some time to do it. I will not disclose how many as I have a guessing game going on at the
IH-Sweden forums, but I will tell later.
Welding the holes shut meant that I had to remove the headliner... The headliner was some kind of plastic, glued
to the inside of the roof, and it was a bitch to get off. Parts of it fell down by itself but a lot of it had some
super glue that was almost impossible to get off.
The plan is to insulate the roof with a combo plate containing both heavy and light material, and then put a thin
board over it. We'll see when that happens, first I have to grind away the surface rust and paint.
2009-03-14.
Yesterday i just went out to the garage very shortly. I just grinded the last of the welds in the roof, and then
I kinda lost the will to do anything more. Sad but true. On the other hand I went out a bit today and fixed the
rear brakes. All new hardware, new wheel cylinders, new shoes. It took some time because I had to collect some
missing parts from the old van I have as a parts rig for GM stuff. So, now I'll have to do new brake lines, and
then on to the front brakes. I'll take the front calipers off the van too, as they are the same.
Steering is solved, I just have to get the parts. What I need is a steering gear from a 90'ies V2500 Suburban, and
I have the hooks out fishing for one...
2009-03-16.
Got a lot of stuff done today... At first I didn't really feel like going out and work on the bitch, but decided to
do it anyway. Good thing I did as I've scraped down the remainder of the headliner, sanded off all the loose rust
on the inside of the roof, and I even gave the inside roof a rust protective coating consisting of Hammerite paint.
After doing all this I felt so satisfied that I decided to seal off some of the welding with fiberglass. I did the
lower parts all around, that is rockers, wheel wells, rear quarters, and the back. This means that I can spray the
inside of those areas with rust protection, spray a coat of primer on the bare metal patches, and then I can move
her out again for a while. Good thing, because I need to get the ambulance inside for some minor work that has been
delayed for too long. Ah, yes, I need to get the steering done first too... But that's coming along fine. I got a
quote on a reman steering gear and I'm waiting for a quote on used one from one of the better wrecking yards.
We'll see which ever it gets to be....
2009-03-19.
Had a dentist appointment today so I thought I'd warm up with a couple of hours of wrenching before that... Didn't
do very much, but atleast I got some fiberglass to seal off the welds of the holes in the roof. Now I just have to
even out the fiberglass and shoot some primer on the bare metal and them she can go outside for a while... Shucks,
well, the steering also has to be done...
I also attached the front drive shaft to the new axle. Had to get some new hardware as the IH hardware was a bit
different from the GM hardware. No big thing though.
2009-03-20.
Today I went out to sand down some of the fiberglass I put on yesterday. I ended up sanding down the whole roof,
getting that ugly green and black color off. There was a lot of surface rust beneath the green and black so I just
did the whole thing with 80 grit on the air sander. Still left to do is to sand the edges round the wind shield and
the drip rail. Then I'll shoot a layer of primer on the roof. If I'm lucky that will happen tomorrow or Sunday.
2009-03-22.
I was going to shoot the primer on the roof today, but got caught up on the idea that I should shoot all spots that
need it at once. So, I ended up smoothing out the rear quarters and found a couple of more holes to weld shut.
2009-03-23.
Finished off the rear quarters, that is they're not really finished as they still need small amounts of body filler
to be the right shape and smooth as a babys behind. Then, at last, I got the primer shot on the roof and the other
spots that were in need of it. That is, rear quarters, front cowl, rockers, and wheel wells.
Tomorrow there will be nothing done, and probably not wednesday either, as I'm going on job interviews. Man, I hope
one of them will get me a new job. I need the doe to get finished with this project...


Left and right rear quarter panel half done...
2009-03-27.
Today I kinda cleaned out all the trash from the back of the ole' bitch. A lot of stuff went into the back of the
old chevy van that now more or less is degraded to storage room. I also took a look at the front shock mounts, and
came to the conclusion that I had to move them about 2.5 inches inward. Angle grinder and welder came in handy here
and I managed to get it done in just over an hour.

Front shock mount welded in new position.
Steering gear is still missing and I have to get something done about that as soon as possible. If everything fails
I'll have to take the bisquit and get a reman one, but the price just isn't right... But wait... There might be a
light at the tunnel, as I got my tax reurn papers today... I'll get a sizeable chunk of green back from the taxman
and part of that will go into the bitch...
2009-03-31.
Not much done today, I only went out and ripped the front brake calipers off of the old van. They fit perfectly on
the suburban front axle. I'll get new seal kits for them and look them over before installing them.
I also decided on how to deal with the steering. I won't get a new steering gear, and I'll fix the geometry with a
raised steering arm. That's the most economical thing to do as it only is a third of the cost of a steering gear.
2009-04-03.
Did a little brake work today. New rear brake lines in place, and best of all is that I had everything needed for
that job on the shelf. No expenses at all! Yay!! I also started out on the front brakes by fixing up the calipers
and checking up hoses and stuff. Turns out I can reuse the G20 van front hoses (they were pretty new) if I switch
right and left sides. Perfect! The warning valve and other brake lines are also coming together, not finished yet
but that's for tomorrow. Seems like I finally made some progress!


Rear axle with new brake lines, and front caliper.
2009-04-05.
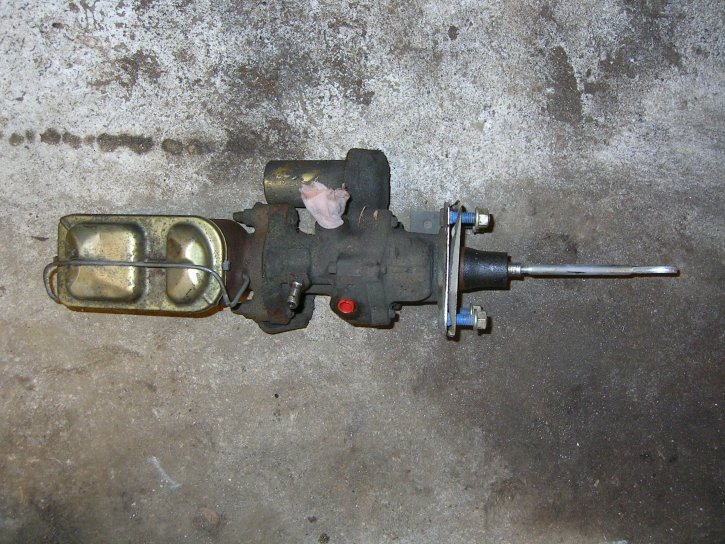
Today and yesterday I did some more brake work on the front axle. Hydraboost and master are in place, warning valve
is attached, and new brake lines done. I've also mounted the calipers and new pads. Yay! Brakes almost done. What's
left is get those bleeders worked loose so I can bleed the brakes. I've hit them with penetrating oil and have been
tapping them lightly. As of yet they're still stuck. Worst case, that is if I break them, I'll drill the rest of
them out and put some new ones in. Heh, I'll probably shell out for new ones anyway if only I can get the old ones out.


Hydraboost and warning valve in place..
2009-04-06.
While I'm eagerly waiting for the new raised steering arm, I welded the bracket for the steering gear back on the
frame. I changed the angle of the steering gear a little, and I think it will be a better fit now. Steering gear is
also in place, and I temporary connected the draglink. Weee... I have steering!

Steering gear back in same place...
Now I just need a tarp for a temporary cover, then it can go outside for a while. I need the space indoors for
fixing a few things on the old ambulance, and to rebuild the TH-700R4 slush box that will end up in this old bitch.
2009-04-09.
Picked up my new steering arm today. Talk about a fast delivery! I ordered it April 1:st and got it today. Turns
out the guy who owns the store where I ordered it was in the US at that time and took it in his personal luggage
just to get it to me faster. That's what I call customer service!!
So, tomorrow it's steering arm time! Oh, and I've started out on the parking brake stuff too. That will be done
tomorrow too. I feel good!!
2009-04-10.
Yeah! Today I swapped steering arms and the new one turned out really good! I did have a small gripe with getting
the old one off... The instructions said that some tapping may be needed to loosen the tapered washers that hold
the steering arm onto the bolts. Some tapping... Well I pounded at it for an hour before it broke loose.


Old steering arm off, and the new raised steering arm.
I also finished off the cables to the parking brake. I had to get the "previous owner" stuff and the chevy cables
together, and I think I got it right. Maybe some minor adjustments are required later on, but the thing works. That
is, everything execept the lever, it doesn't lock, but I'll take care of that too...
2009-04-12.
Finished up some stuff today, like the parking brake and front axle things. The parking brake lever had some ingenious previous owner fixes that I had to remove, and presto, now it works!
I also got the front caliper bleeders loose... To get them off I had to weld a nut to them and hit them with
penetrating oil and the big ol' hammer. Then they came loose. Yay! I have to get new bleeders...
Tomorrow I'll probably make sure that I have usable nuts for the fuel tank straps, and then hit all the hollows
with rust protection. Then she'll go out for a while.
2009-04-13.
Just did some minor things today, like connecting the push rod from the hydraboost. Not an easy thing as it is very
tight down there. Had to lower the steering column again (for the third time) to get the pin in...
I also started out on the brake light switch, which really is a combination switch for brake lights and the lock-up
for the TH700R4. Got all things to do it, but I still have to put it in place.
2009-04-15.
Orderd new bleeders for the front today, will be here tomorrow. Got the nuts for the fuel tank straps welded in and
sprayed some rust protection in the rear fender hollows. That's it for today. Tomorrow is another day...
2009-04-16.
Not much done today, went to pick up the bleeders but they weren't the right ones. Sigh.
So, I just ripped off the drivers door as the hinges were broken anyway, fabbed up brackets for the brake light
switch, and oiled up a new pair of door hinges. Ah, I also put the body lead on the new drivers door to make it
ready for filler. Will try to locate the right bleeders tomorrow, and then it's off to wash the ambulance as it is
going to be used at a wedding on Saturday...
2009-04-17.
Picked up my bleeders today. This time they were the right ones... Other than that there will be no work on the
bitch today or tomorrow. Need time for other things too...
2009-04-20.
Finished the brakes today, that is I installed the front bleeders and bled them. Yay! Now it has brakes! I also
put the new drivers door in place and adjusted it to fit almost correctly. There's a minor adjustment still to do
but I'll do that when I prep for paint.
Oh, and I evicted her from the garage, for a while that is. Need to clean up and get some things done on the old
ambulance. Like installing a new gas tank and the flexi fan and shroud. She's not getting wet though, I zapped
or more correctly, zipped together a small tent for her... Pics below.


Got her outside and coverd her up from rain and nosey people.
2009-05-09.
Time to get to work on this one again. First off is to rip the slushbox apart and give it a new master kit. I will
probably start with this either tomorrow or the day after tomorrow. I've prepared a temporary clean work bench, and
cleaned the ouside casing so far. This will be an adventure as it is the first slush box I dig into...
No fear though, I got the unit repair manual and for once it is having a very good description of the job at hand.
We'll see how it comes out, hopefully with success.
2009-05-15.
Slushbox almost done, just waiting for a 1-2 accumulator spring that I found out was broken. It wasn't as bad a job
as I thought to rebuild the thing, just time consuming and needed a lot of concentration not to loose any parts.
Now let's just hope it works like it should... I won't know until this old bitch is supposed to move under its own
power. Link to the rebuild page Here.
2009-05-25.
Got a little time over for the old bitch today, but not much. Just enough to do some finishing and clean up work.
So, I got some oil into the front and rear diffs, oh and I hunted down some bolts for the front diff cover too...
That's it. Not much, but better than nothing.
2009-06-18.
Finally!! Yeah, you got it right, finally I got some time spent on this poor rig again. Not very much done, but
was rewarding stuff for once. I put the wire wheel on the angle grinder and wire wheeled all pieces of the inner
fenders. Then I welded up those few parts that had any rust through, just two small pieces, and I even got it all
painted. I guess there was about five pounds of gunk removed from the outside of the inner fenders, spread all
around the garage, so I had to do a clean-up too...
But all in all, it feels good to make something look good for once. Even if it's just black Hammerite. But looks
really nice compared to what it was like.

Inner fenders, looking pretty good...
2009-06-20.
Spent a couple of hours with the welder and angle grinder today... That is, I started out on the passenger side
front fender. This one is in bad shape, but it is what I have and I have to cope with it.
Lots of rust, lots of bondo, and a couple of really ugly patches. Oh well.
Lower rear end is patched, and the brace on the inside of the fender is also patched. Now it's just the rest left
to do, that is upper rear piece, and all the way around the headlight. Pictures...


Lower rear patch of passenger side front fender.
2009-06-25.
Finished up the right front fender. This will be a temporary solution until I can get a better fender, as it is
really, really bad. Bondo all over it, patched numerous times, and surface rust under the bondo...


Front part of right fender before and after surgery.
2009-06-26.
Went out today to do some assembly of the engine and transmission stuff. When I put the converter on the tranny
I found out that the pump was stuck. So, I dropped the tanny pan and removed filter and lock-up solenoid, and
took the pump out. Tried it on the converter, and yep, the pump was stuck. Disassembled it and found a cracked
pump drive. Now I have to source one of those too... I hate it. Pics later.
2009-06-28.
Not much done today, but I managed to take the wire wheel to the inside floors and drop a coat of color on them.
Turned out pretty okay I thing. Pics...


Left front, right front, and rear floors after paint.
2009-06-30.
Ordered a new, that is used but in good shape, pump assembly for the slush box today. Should be here Thursday or
Friday at the latest. Then I can assemble engine and transmission, drop it in, and start on real, more rewarding work.
2009-07-03.
Well, Friday today and no pump has shown up. This is bad, because I don't want to start with anything else until
the slush box is finished and covered up. Anyhow, right now it's too hot to do anything serious anyway, so I'll
just sit in the sun and melt away...
2009-07-09.
Yay! Pump came in today so I buttoned up the slush box and all seems well. I also checked on the hood and found
out the I'll have to bring out the welder for that one too... Both rear corners on the inside are pretty much gone
and one of the nuts for the hinges also has broken off. Pics below show right side before patching, and left side
with a patch on the way...


Rust and patch, inside of hood.
2009-07-11.
Today I finally got the engine and transmission together. This means that I can get them installed when ever I
feel like it, which better has to be soon...
I also made the last patches on the hood, turned out pretty well. Now I just have to wire wheel the whole shebang
and give it a coat of primer and paint. Patches pictured below....


Patches, left and right....
2009-07-12.
Well, went out to the garage a little while today... Nothing much done, just patched and painted the battery tray
and painted the air cleaner. Stuff that has to be done... Oh, I also started to losen all the bolts for the doors
to make sure they're easy to get out when the time comes to swap out the dented doors for the better ones.
2009-07-21.
Shame on me, shame on me... Haven't done a thing on the poor bitch lately.
Stuff has come up that could not be ignored, like trying to get our pool finished before it gets too cold to take
a dip in it, and now it seems like I've come down with the flu of some kind. Shucks! Never a dull moment in life.
Today, the first day I even got out of bed, is our 8:th wedding anniversary! Wine and dine, no work.
I have done some thinking though, and I think I have changed the master plan a little. Next steps will be engine
and tranny, front and fenders, and make it move under its own power. Much easier than having to push it in and out
of the garage. For sanding and stuff I'll do as with the old ambulance, get me a couple of slaves for the boring
parts of work...
2009-07-25.
Some thing got done today... Not much, but I cleaned out the garage and stuffed all the sheet metal parts I've been
working on into the old chebby van. Then I got the poor bitch indoors again, ready for engine and tranny.
We'll see when that happens, hopefully pretty soon. But first I have a pool to finish....
2009-08-03.
Rainy day so there was no work done on the pool... Anyhow, I got something done on the poor bitch. Engine and
tranny is in place but not bolted down. Still have to mount the transmission cross memeber, but at least I can roll
her around while the tranny hangs from a sling through the shifter hole.
2009-09-01.
Today I finally found the energy to start on the BB again. It has been a both tedious and exciting month, and just
no time or energy left. Our secondary car got totaled and I had to deal with the insurance company. The slushbox
in the old ambulance decided to crap out on me, so I had to deal with that too...
Anyhow, today I finally got the transmission crossmember mounted, and got the last pieces of the intermediate
drive shaft together and installed. Every thing went quite smoothly, just had to do some minor adjustments to the
tranny crossmember, but no big hick-ups.
2009-09-07.
Been thinking a bit about how to solve the problem with the transfer case lever... The OEM one is butt ugly and weighs
a ton. I'm thinking of dropping in a shifter from an automatic and modifying the ratchet so it locks in at 2H, 4H, N, and 4L.
I'll also mod the little plastic window to show "2H, 4H" and so on.
I think it will work out nicely.
2009-09-20.
Exhaust... I hate to do exhaust work. I've been living in fear of taking on this task for a long time now, but finally got
to it today. Turned out iy wasn't that bad at all!
I used the front pipes from the old Chevy van and modyfied them a little as they were a little too tall. Passenger side
exhaust pipe was simple, from the 45 degree bend at the engine it's a straight pipe all the way to the rear of the
transfer case. There it crosses over to the drivers side and joins the drivers side pipe in a 2-to-1 small muffler. From
the muffler it becomes 3" pipe, and goes over the rear axle into another muffler and then out below the rear bumper.
2009-09-26.
Made a list of things to do on this project in the near future and have started to finish things off of it. Like connecting
Transmission cooler lines, getting the radiator fixed, and making a new engine electrical harness. These things are
done, but there are still a lot of things on the short list to do. Lots of rewiring, fixing up the front and mount inner fenders
and get everything connected. In short make her move under her own power...
Well let's see how long it can take....
2009-10-01.
Did the last adjustments on the exhaust today and finished everything small, like fasteners and such. More work than
anticipated, but it always is. Also did the oil cooler lines today, new hoses and new connections to the engine. Tomorrow
I'll get the recored radiator, so we'll see how that fits. Hopefully it's as simple as making two new lower mounts...
2009-10-03.
Well, yesterday I got the new radiator and it's looking good! It's the rad from the chevy van, but the core is cut down
about three inches. On the other hand, it was a two row core before, but I ordered a three row core, so cooling capacity
should be even better than before.
I also shopped for some other minor stuff yesterday, like a furd starter relay to use as relay for the glow plugs. I'm going
manual glow on this one too, using the 60G self limiting glow plugs.
Now, what happened today then? Well, I started to fit the rad yesterday but didn't get the lower mounts correct. Today
I rectified thet problem and also fabricated the upper mounts. Fits like a dream. Maybe a bit close to the steering gear
but I think there's enough clearance. New glow plug relay is also in place and wired up.
Next will be finding radiator hoses that fit. The old ones from the chevy van are too long, as the rad is three inches
narrower now than before. No big deal, just time consuming. Then there's the small matter of rewiring the ignition key.
The lock will move from the dash to the column, so there's some wiring to do there. Like turn signals, brake lights,
ignition switch, horn, wipers, and other stuff. But let's not get ahead of things...


The shiny recored radiator and a picture of it in place.
2009-10-16.
In beween fixing our kitchen I managed to sneak out to the garage today... All I got done was to fasten four nuts
for the engine mounts before the phone rang... Got another item on the "honey-do" list. New tires for our new
secondary car (a Chrysler Voyager) ASAP and that is today... So, I had to drop the tools and go shopping for tires.
Well, at least the engine is secured now...
2009-10-20.
Got some things done today, like fixing the radiator hoses and wiring the new ignition and light switch. The rad hoses
were simple, I just cut out a four inch piece of the upper one and clamped it together with a bit of pipe. Nice fit. The lower
one almost fit as it was, just had to cut off an inch at both ends.
The wiring is a pain. Not that the ignition and light switch were difficult to wire, just a pain to try read the numbers of the wires.
Turn signal, hazard, and brake switch will be a lot worse to wire. I want all the bells and whistles that never
was an option on the '64 model, so I have to do it from scratch. Almost anyway. But that's in the future...
2009-10-21.
Finished up the wiring, well, almost. Still gotta get the wipers wired with the GM delay module. That means that I'll have
to change the wiper motor too.... And the glow plug control circuit still needs a switch and control light. Small issues, but
they all add up. Turn signals, hazard, and brake light are at least good to go.
2009-10-22.
Got some new hoses made up for the power steering and hydraboost. It's very tight at the steering gear, just about an
inch and a half between the steering gear and the power steering pump, so I have to use banjos at the steering gear.
Hoses fit perfectly and I got an inch of clearance between the steering gear and power steering pump. Now I just have to
find a place for the fluid reservoir...
2009-10-25.
More stuff done today... Finished off the power steering, that is, bolted the reservoir to the front piece and connected the
hose between the pump and reservoir. I also made the hoses for the engine oil cooler and connected them to
the radiator. I also started to figure out how to mount the shift lever for the transfer case. There will not be a new lever,
I'll re-use the old one even if it's both ugly and heavy.
Let's see if I can connect the last hoses, for the cab heater, tomorrow, and maybe something else too...
2009-10-26.
Didn't do a darn thing today, except shopping heater hose, trans fluid, and some minor stuff. Just didn't feel to
do anything with the old girl. Grumpy, tired, and cold...
2009-10-27.
At last, something done today... Heater hoses are connected, heater control cables oiled and working, and I fabricated
a new battery tray on the passenger side inner fender. I did it the same way I did it on the '67, molded it into the inner
fender and welded it in place. Now I have to start assemble the drivers side inner fender and get those batteries connected.
2009-10-28.
Went out to the garage a short while today. My back is hurting today so I didn't do very much. Just connected the glow
plug controller circuit, fabbed and installed all four battery cables, painted the passenger side battery tray, and fabbed
a bracket for the throttle wire. Oh, I did some clean up of the panel too, choke and hand throttle cables removed.
2009-10-30.
Managed to get a couple of hours today too, so things are happening. Installed the instrument cluster, wired up
the last few things, and installed the batteries. I also installed the diesel pre-filter. Seems like I did good on the
electrical stuff so far, engine turns over!
Now on to the other stuff like TC lever, connecting the tranny to the shifter, fixing the fuel tank and connecting
the fuel system.
2009-10-31.
Did the shift lever today... I never though that such a simple task would be that complicated. Getting the
geometry right is not easy at all, and on top of that there's an exhaust pipe claiming space that the lever
down at the tranny also wants... Well, almost done. Just some minor adjustments left, which probably will
make me redo it from scratch again...
2009-11-01.
Got some things done today... Tried getting the shifter aligned but failed miserably. I just can't get that
geometry right. Will re-think and re-do later.
Put in an electric fuel pump, complete with a heat shield, and fixed the hoses and wires for it. Put the hose
ends into a container with diesel, primed it, gave it 10 seconds of glow, and hit the starter...
It fired up right away! But then I discovered a few things... There's a hole in one of the pipes to the engine oil
cooler, so I got the whole engine compartment hosed down with black, icky engine oil. I must have messed up
when I installed the cover under the converter because it some how has come to touch the ring gear and thus
makes a terrible racket. Trying to stop the engine I discovered that I forgot to put a diode in series with the field
connector on the alternator. I didn't stop when turning off the ignition key, it didn't stop with disconnected battries
but it did stop when I yanked the wire to the fuel shut off solenoid.
Gotta clean up that mess as soon as possible and get it running! I need to get some speed into this project again.
2009-11-02.
Got another day out in the garage, doing what I like... Fixed the broken oil cooler pipe, fixed the convertor cover
and installed a diode in series with the alternator field circuit. Filled her up with tranny fluid and started her up.
Runs like a dream. Thought for a while about the obnoxious tranny lever linkage, had an idea, and fixed it. Works
like a charm. Started out on the lever and linkage for the transfer case and discovered that I had to move the whole
shebang up about three inches. The space it needed was occupied by the transmission... Had to shorten the lever
about three inches too as it hit the dash.
That's about it for today...
2009-11-05.
Transfer case shift lever is in, and working. Had to make a new bracket for it as there's no provosion to mount it on
the transmission as it was before. Now it's bolted to drive line tunnel with plenty of rubber in between. I sure hope
it won't make too much noise.


Electric fuel pump and TC lever installed. Note the lever is moved up and shortened.
Tomorrow is drive shaft day... I'll fab up the missing rear drive shaft, and if there's time left I'll start on the tank too.
2009-11-06.
Did the rear drive shaft today. No problems, cut the old rear flange off, cut a piece of an old chevy drice shaft that
fit perfectly into the IH tube, aligned it and welded it together. Looks like this:

Rear drive shaft, ready to be installed.
There was a slight problem installing it as it turned out that mounting hardware is different on the 14 bolt than
on the 10 bolt that was in the old chevy van. Will have to order new mounting hardware monday...
2009-11-07.
Sore back today so I didn't get much done. Anyhow, no need for new hardware mounting kit for the drive shaft. I took
a peek at it and decided I could modify the existing hardware pretty easy. Did it and it turned out well. Drive shaft is
permanently up now.
I also looked the fuel tank over and found a couple of thin spots with some pin holes. I wire brushed the area and
filled it up with body lead. Should be good enough as it's at the very top of the tank. slapped on some hammerite
paint and installed the tank too. It has to come down again though, as I forgot to connect the fuel sender wire.
2009-11-11.
Pulled the tank again today. While it was down I put in an extra vent at the rear of the tank. Hopefully this will help
getting air out when fueling up at the pump. The old ambulance is a hell to get fuel into as spurts and coughs fuel
back up the filler all the time. Takes for ever to fill the tank.
I also started out on the fuel filler pipe. This time I made it out of 1-3/4" pipe instead of 2" and thus moved the bottle
neck in the filler to the top. This will also help when fueling up. At least I hope so.
2009-11-12.
Today I finally installed the fuel tank again, didn't forget the wire to the fuel level gauge, and finished the fuel filler.
Painted the filler, so it has to dry before installation.
2009-11-18.
Finally a couple of hours worth of work done... I had to redo the filler neck again but that was just minor adjustments.
So, filler neck and vents in place. Filled her up with a couple of gallons of diesel, filled her up on antifreeze, and
started her up. Runs like a champ. Filled about five quarts of tranny fluid while idling and filled up the power
steering reservoir. On to test the tranny...
Don't know yet if I screwed up somewhere in the tranny, I've just let her roll about three feet back and forth.
Reverse works fine. Drive seems to slip alot but gets better and better. In 3, 2, and 1 there's no slipping at all.
I don't know how and if it shifts, or how the shifts feel as I haven't had her move more than a couple of feet. If the
weather is better tomorrow, i.e. no rain, I'll take her for a spin and see...
2009-11-19.
Yeah! Took her for a spin today and confirmed my suspicions about just slipping in D4. Almost no movement
forward in D, but in 3 it starts nicely and shifts like it should. Shifts are nice and firm, almost perfect. Guess I
need to find out why it does like that and fix it.
Also, there's kind of a rumbling noise from the drivetrain, and I suspect the transfer case rubbers are shot.
I guess they should be after 45 years of use and abuse.
On the more sinister side, the pretty much brand new electric fuel pump decided to crap out on me, luckily it
had the decency to wait until I was parked on the driveway, ready to let her into the garage again. This made me
so depressed I had clean up the garage a bit...
New pump will be ordered tomorrow, old pump will be returned and I'll freaking demand a refund.
2009-12-01.
So, I finally got to pick up another fuel pump today. I spent a couple of these lost days looking at fuel pumps, and
it seems that no one will say that their fuel pump is compatible with Diesel fuel anymore. Well, I found some
variations of pumps that were Diesel complient but they were about 50% higher in price than the gasoline version.
Anyway, I got one just like the one I returned. Cheap, and they say it's good for Diesel fuel too. We'll see...
2009-12-02.
Today she ran again! Didn't do much more than drop the fuel pump in. Just didn't have the right feel...
Oh, yeah, I also cleaned up a few patches on the front piece where I need to weld in a few small patches, and a
dent that has to be pulled out. That's it. Hopefully I'll get some more done in a few days.
2009-12-14.
Been having a cold last two weeks... A bad one, really bad one, but now I'm back on track again. Did a few
small things today like welding a couple of patches to the front and pulling that little annoying dent I mentioned
in my last journal entry. Thank God for the slide hammer. Just weld it on and a few pulls later the dent was gone.
I also managed to break the handle of one of my body hammers. Lousy cheap hammer with a fiberglass handle.
It broke clean off while tapping some sheet metal gently... I'll get a proper hickory wood handle for it, but it'll
probably cost as much as the whole set of hammers and dollies.
2010-01-02.
Haven't done much lately but I do feel that I have to get going soon... So, what's happened during the last
shivering days of the old year, and the even fewer days of the new one? Well, I swapped out the passenger side
front door, as the old one was severly dented. Getting it adjusted isn't a simple task, but it's getting there...
I also had to swap the alternator as I found out it delivered over 17 volts. Not good for the batteries at all.
Also, I've been thinking a little... Yeah, I know, I shouldn't. But I made the decision that I'll have to get done
with the front end sheet metal before getting on with other stuff. I need some structure now.
Did some body lead on the right front fender, next is leak checking on the fuel filler pipe, then mounting the
front fenders and the hood. That'll keep me busy for a while.
2010-01-06.
Ahhh... Left front fender is on, adjusted, and bolted down. Not much for a day of work, but I had to wait a bit
for the place to heat up. We're at -6C right now and that is no nice temp to work in.
I also managed to destroy my new work light by stepping on it. Cheap China trash. It really should hold up
for that, but once again I prooved to myself that the cheap stuff isn't good enough. Gotta get a new one...
2010-01-07.
Fixed the fuel filler pipe and got the right front fender on and bolted down today. Still freezing temps here
and I don't like it at all. No nice work environment.
She starts to look like a truck again now, just need the hood to come on also and she'll be looking good.
Can't wait to take her for a spin, and can't wait to fill her up at the pump either. I'm really interested to
see if the double tank vents will make a difference in filling speed.

Looks like this at the moment...
2010-01-11.
Started her up today after giving the batteries a good recharge. Had to, as I had forgotten to turn off the
main power switch. The electrical system is not finished yet and can be described as flakey at least...
So, here's how she looks on the road...


Front views. Good thing the boys in blue didn't show up...


Rear views. Ah, and with my daily driver in the background.
2010-01-25.
Well, at last I got something done... I've been looking for something to use for front turn
signals, something that is either good looking or something discrete. This is what I found...
I decided to mount them inside the grille and I hope it won't get me in trouble at the safety
inspection. Oh, well. I'll deal with that then... Pictures...


Front turn signal light and what it looks like mounted behind the grille.